Once your initial backup is complete, you’ll be able to use the restore and export functions in Spanning. The amount of time it takes to complete your first backup will vary according to how much data is being backed up in Salesforce.
When information is lost, your end-users and administrators can quickly find and restore data from any point-in-time backup. The speed, accuracy, and user experience for restoring data are key to keeping your organization moving forward and reducing business continuity risk.
See these topics for details:
Run this procedure to restore previous versions of individual objects directly back into Salesforce:
- Log in to Spanning Backup for Salesforce and navigate to the page record whose object data you will restore.
- Click Restore to initiate field-level compare and restore of Salesforce record data directly from this individual record page.
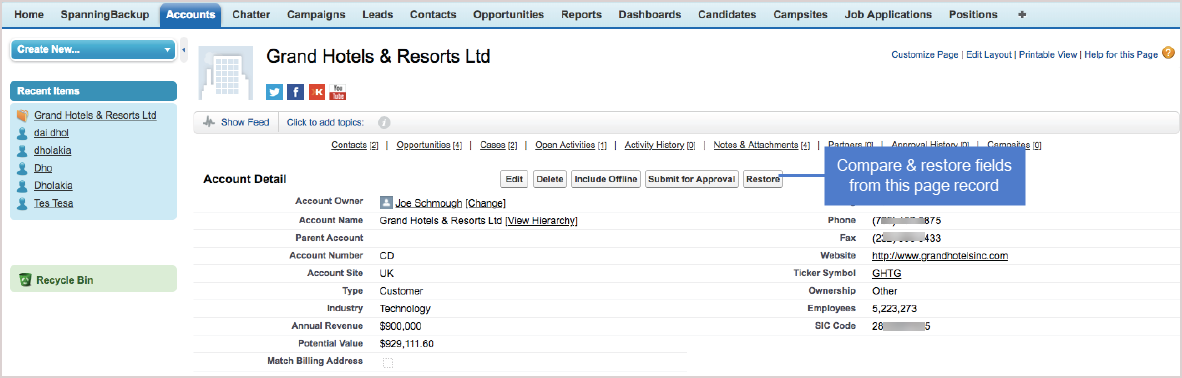
NOTE If the Spanning Restore button is disabled there is no restorable data for the object type on this particular page.
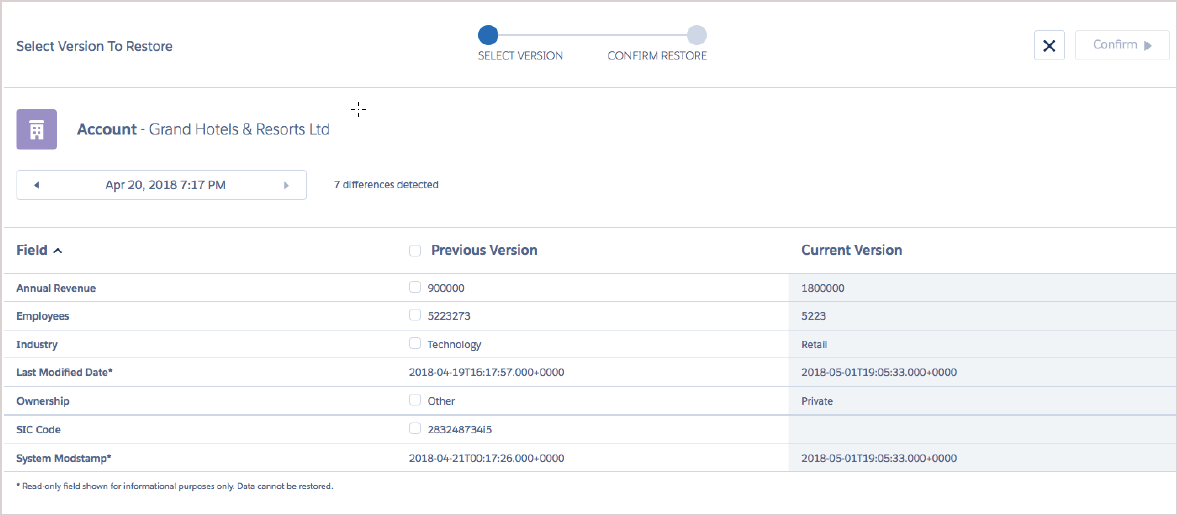
- Select the backup date and individual fields you would like to restore. Click Confirm.
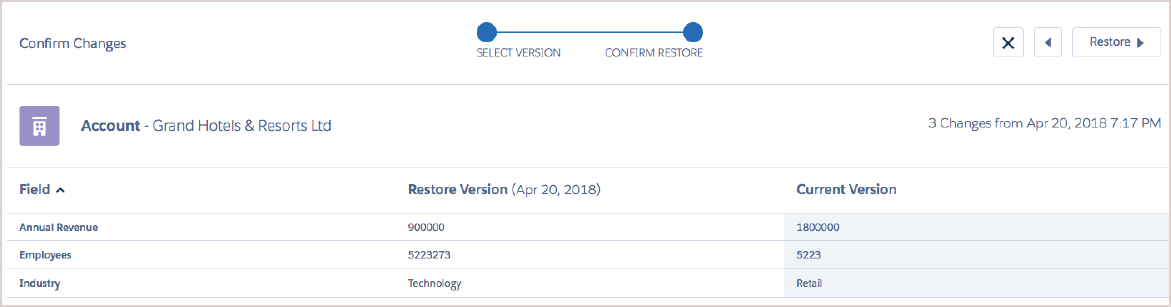
- Review your pending changes. Click Restore. The selected data is restored into your Salesforce instance.
Spanning Backup same-org restore enables admins to undo a delete or update in bulk— quickly, easily, and automatically from a specified point in time.
By using the UI Search method, you can restore all updated, unchanged, or deleted records in an object type at once. And you can choose whether to restore the related child-grandchild items (master-detail relationships) of any parent items. For details, see To restore object data to the same organization.
If you know exactly which records you need to restore, you can opt to upload a CSV file containing the Salesforce IDs of these records and restore them to your Salesforce org. For details, see To restore to the same organization by importing a CSV file.
Use this procedure to restore recently updated, deleted, or unchanged records to the same organization.
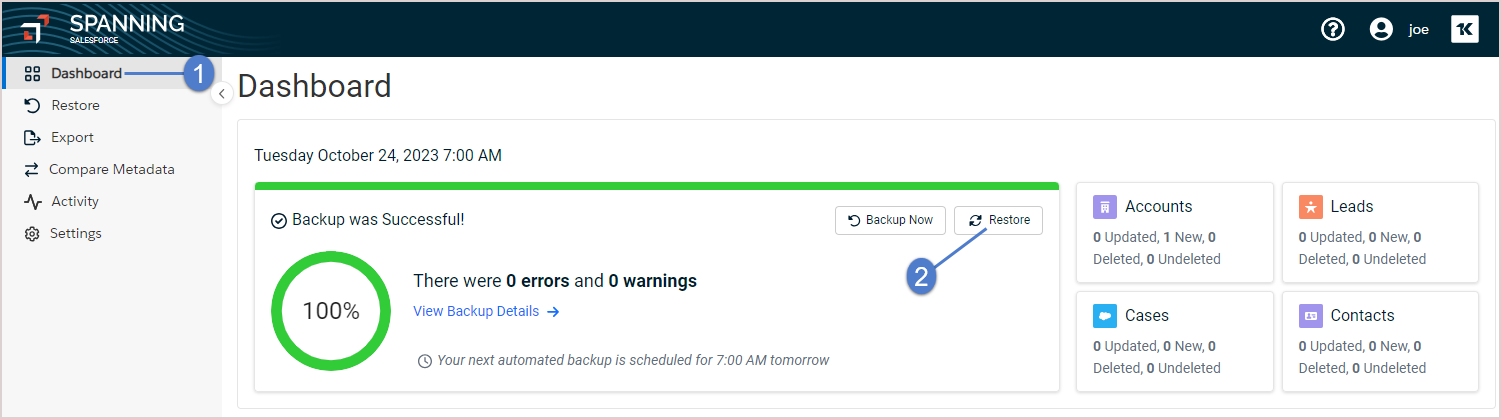
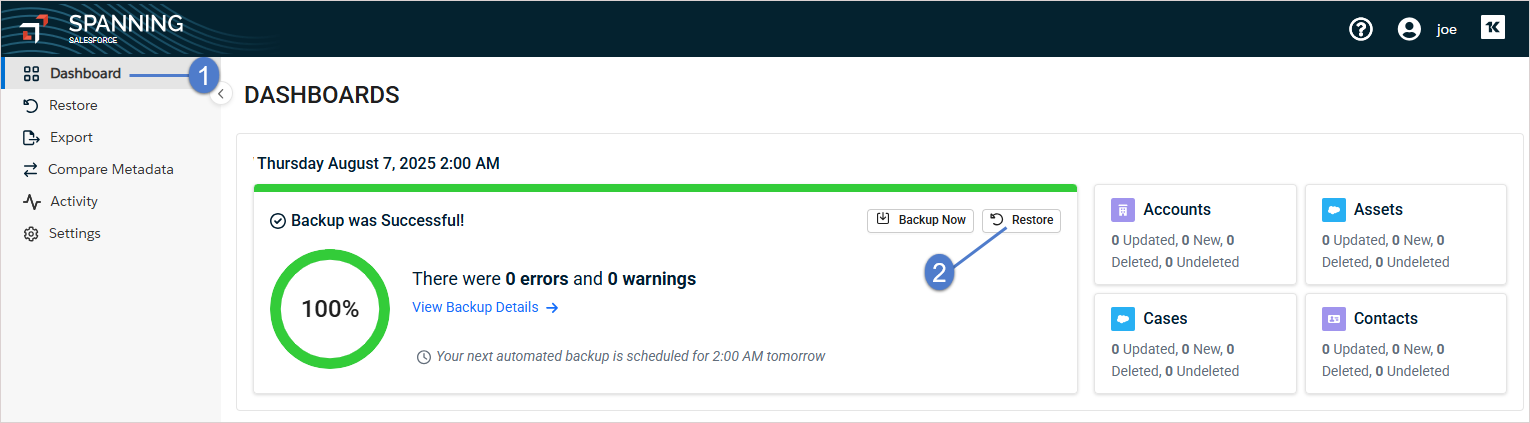
- Log in to Spanning Backup for Salesforce.
- Click Restore on the main Dashboard.
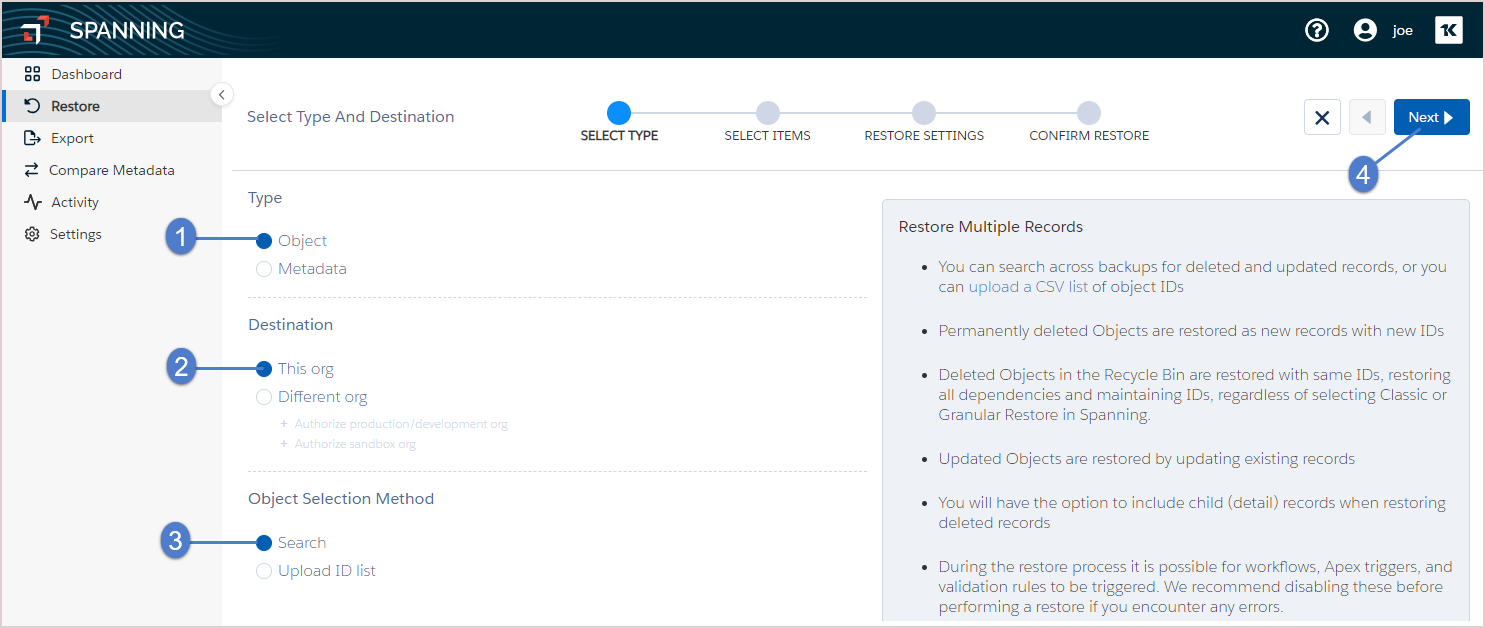
- In the Select Type step, make these selections:
Select Object as the type of data you want to restore.
Select This Org for the restore destination.
Ensure that Search is selected for the Object Selection Method.
- Click Next.
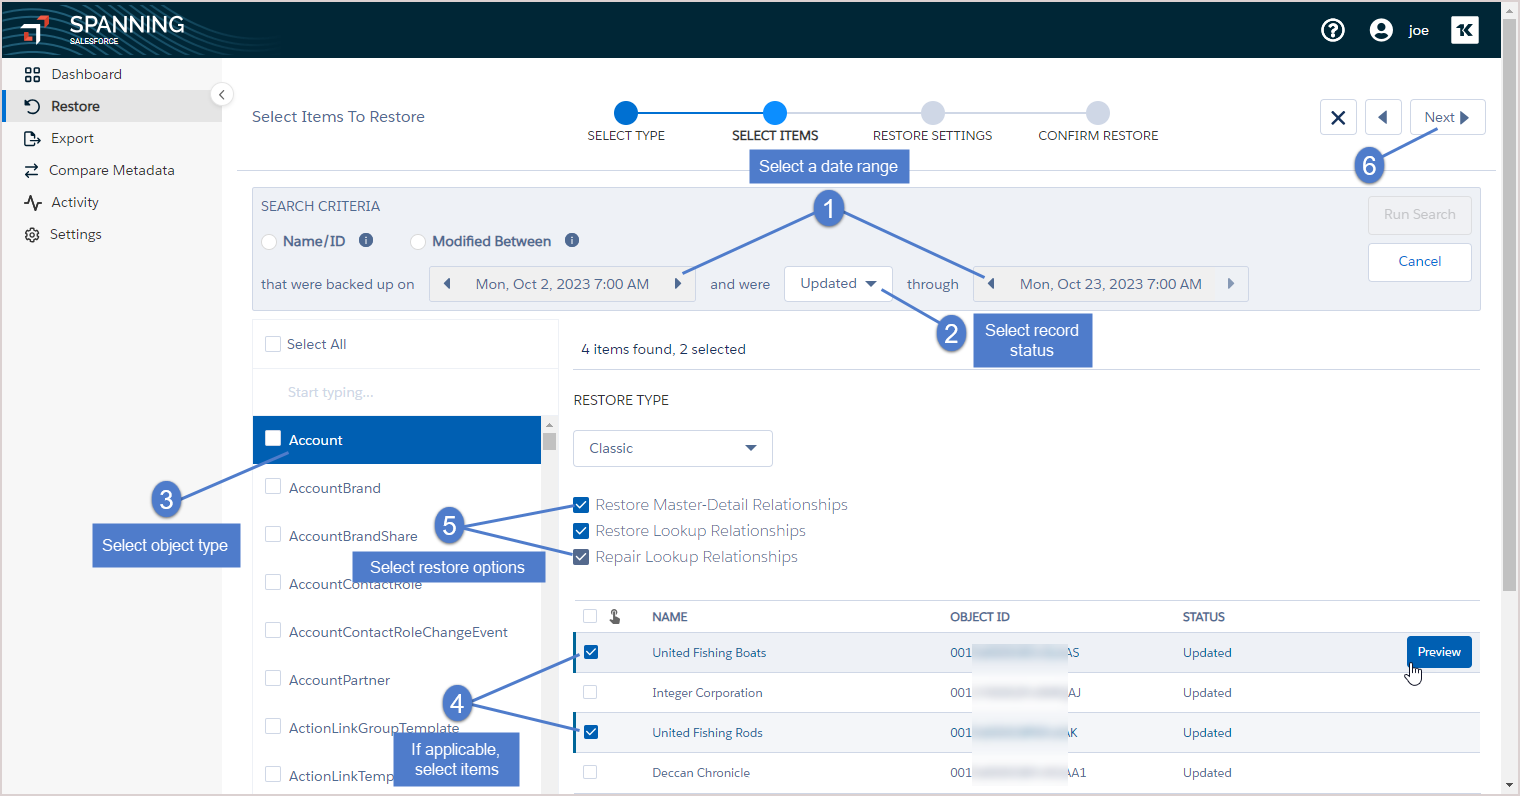
- In the Select Items step, make the selections described below.
Select a date range and whether you want to display items that were Updated, Deleted, New or Updated, or Unchanged since the first backup selected.
Select the object types that you want to restore:
- To restore an entire object, select its checkbox.
- To restore selected items, click the object type but do not select its checkbox.
- In our example, we are recovering updated items from the Account object type.
(If applicable) Select the items that you would like to restore. You can select as many items as you like. Additionally, you can preview any item by clicking the Preview button before you restore the data. (To display the Preview button, hover over a row. The button displays on the right.)
(If applicable) Choose whether to restore master-detail relationships during restore.
(If applicable) Choose whether to restore or repair lookup relationships during restore. When records are restored, they generate a new Salesforce ID. This feature attempts to repair or update any lookup relationships that were referencing the record prior to restore.
- Click Next.
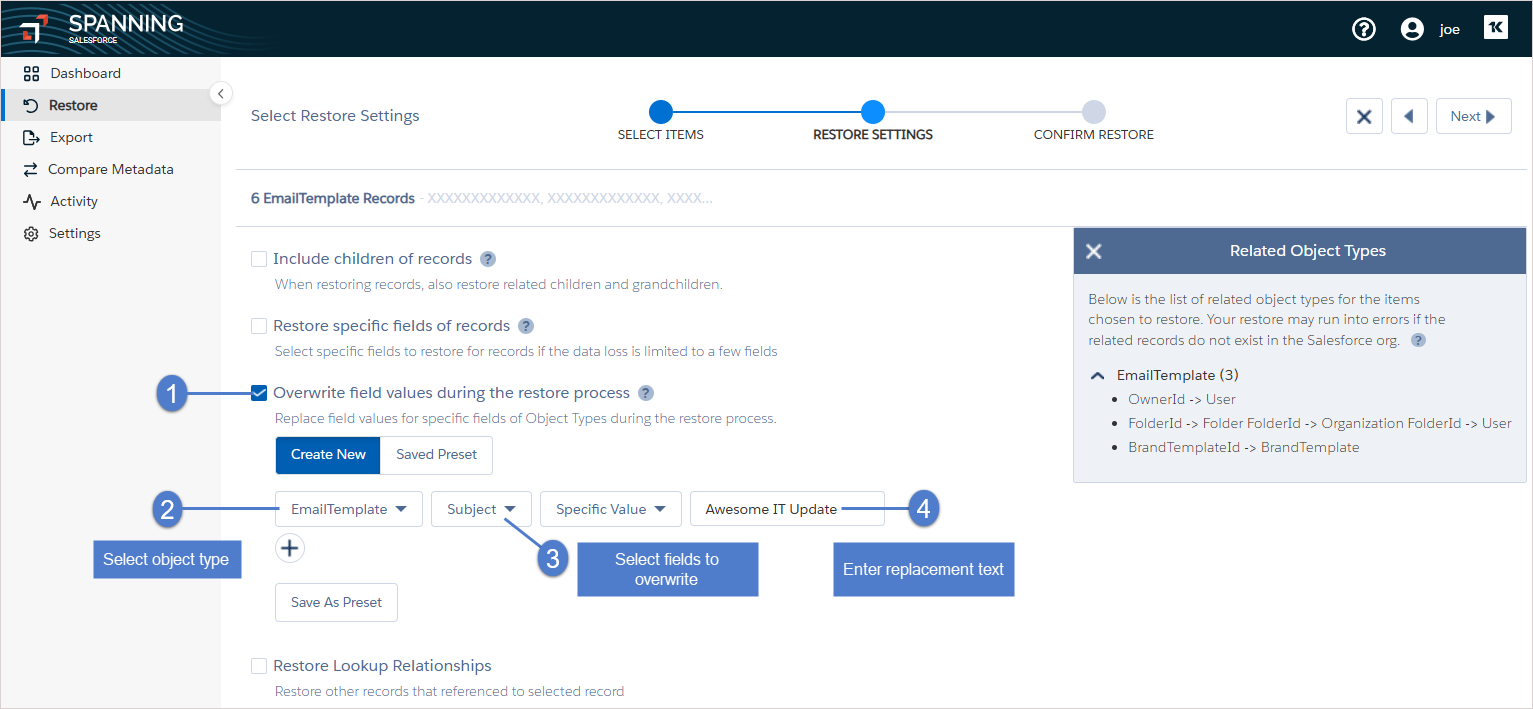
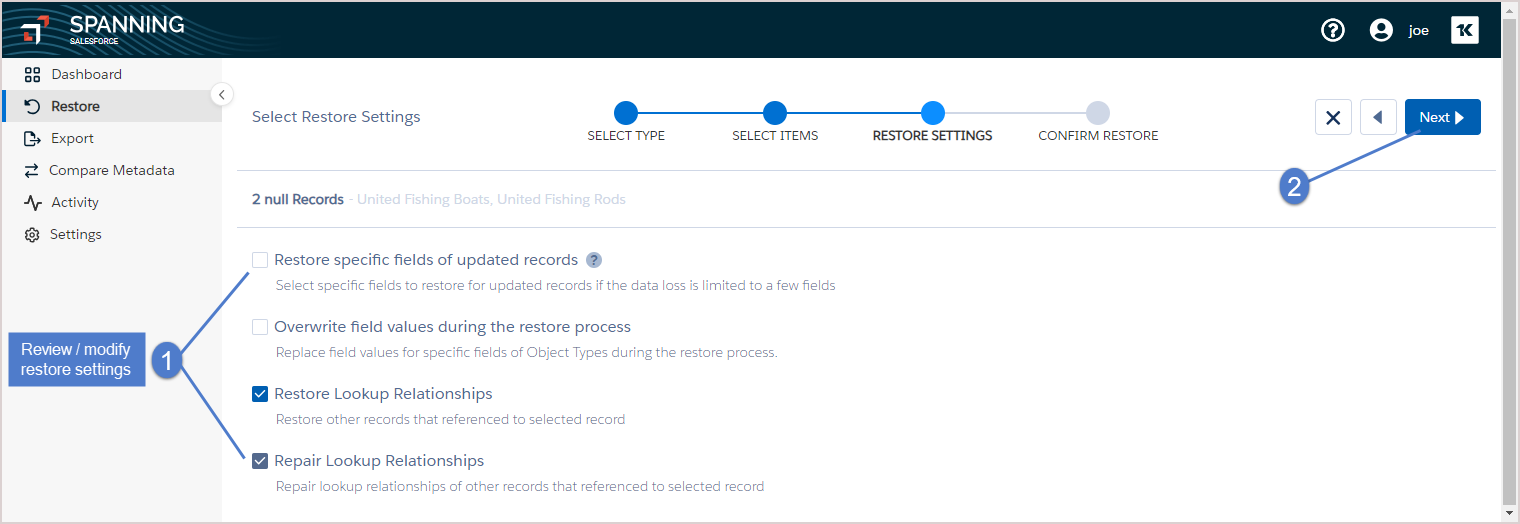
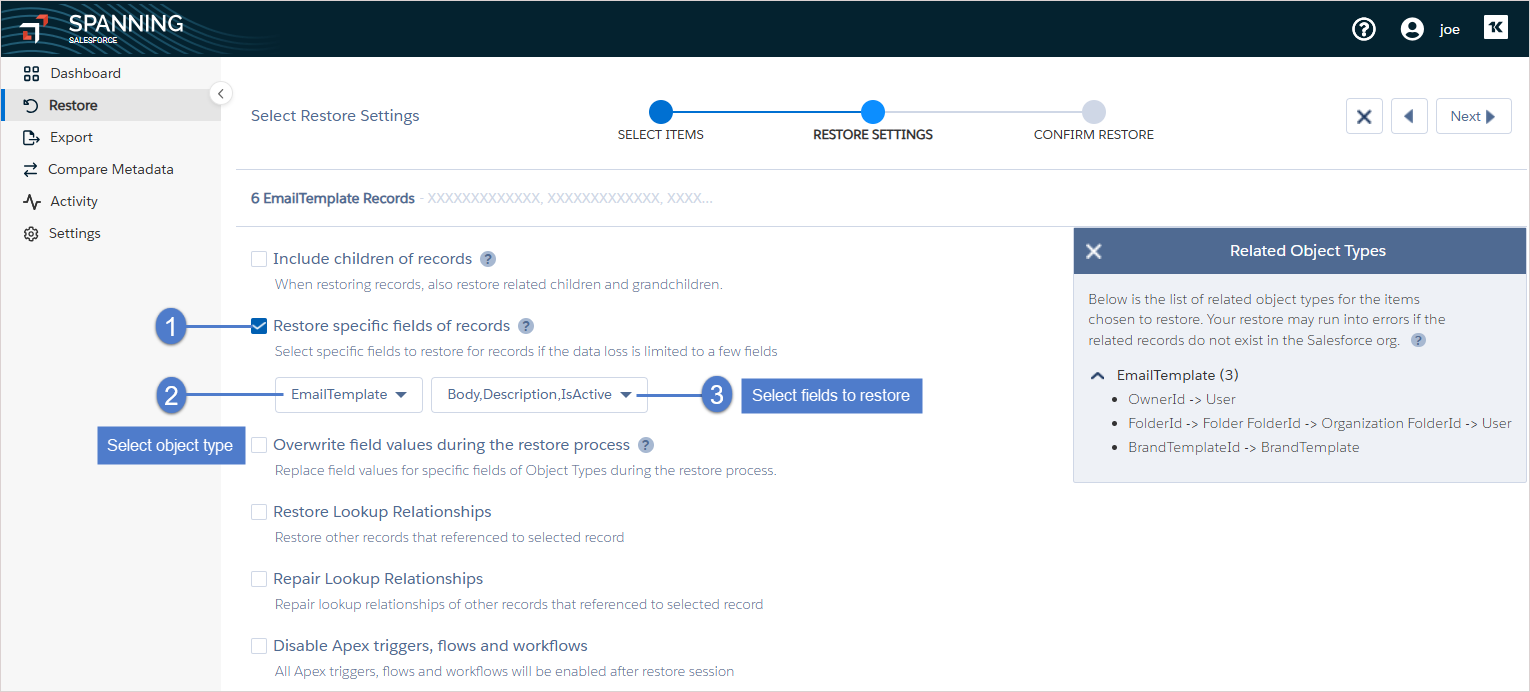
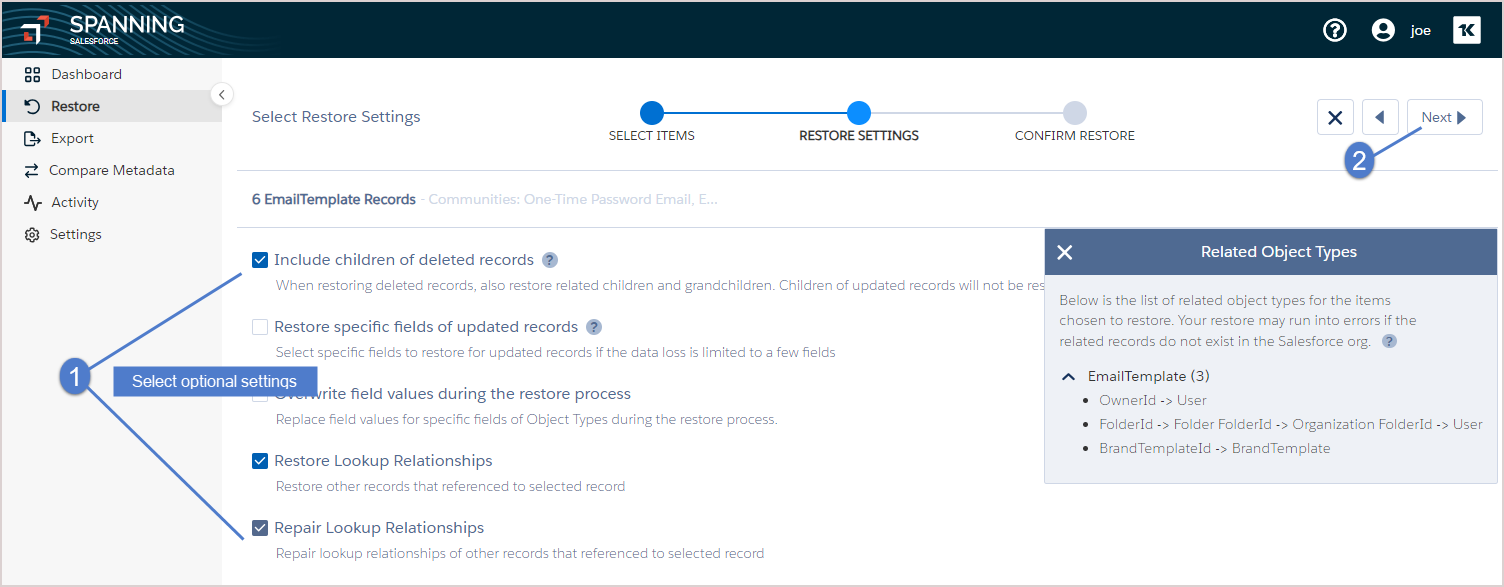
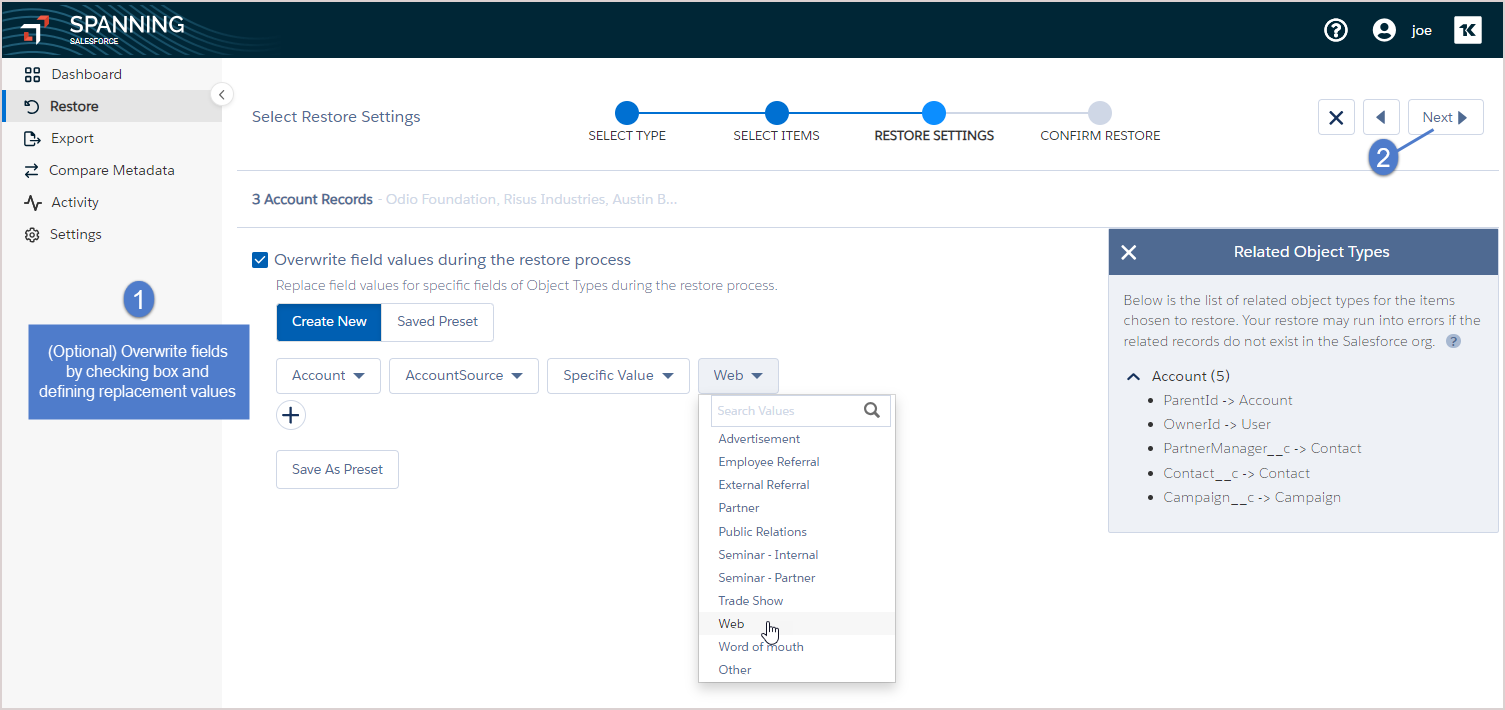
- In the Restore Settings step, select optional restore settings by checking the applicable boxes.
Settings are described in the following table.
Restore setting Description Include children of records Check this box to restore related child and grandchild records. Restore specific fields of updated records Check this box to restore specific fields for updated records instead of restoring all fields. (This applies only if a record contains updatable fields.) Check the box, then select the object type and fields that you want to restore.
Overwrite field values during the restore process Check this box to overwrite field values during the restore. Check the box, select the fields that you want to overwrite, and then input the values you want inserted. Alternatively, you can choose Saved Preset if you would like to reuse saved overwrite values or Save Preset to save the new values you enter.
Restore Lookup Relationships Check this box to restore lookup relationships. When records are restored, they generate a new Salesforce ID. This option attempts to update any lookup relationships that were referencing the record prior to restore.
Repair Lookup Relationships Check this box to repair lookup relationships. When records are restored, they generate a new Salesforce ID. This option attempts to repair any lookup relationships that were referencing the record prior to restore.
Disable Apex triggers, flows and workflows Check this box and click Confirm to disable triggers, flows, and workflows during the restore session. (Triggers, flows, and workflows are automatically re-enabled after the restore session.)
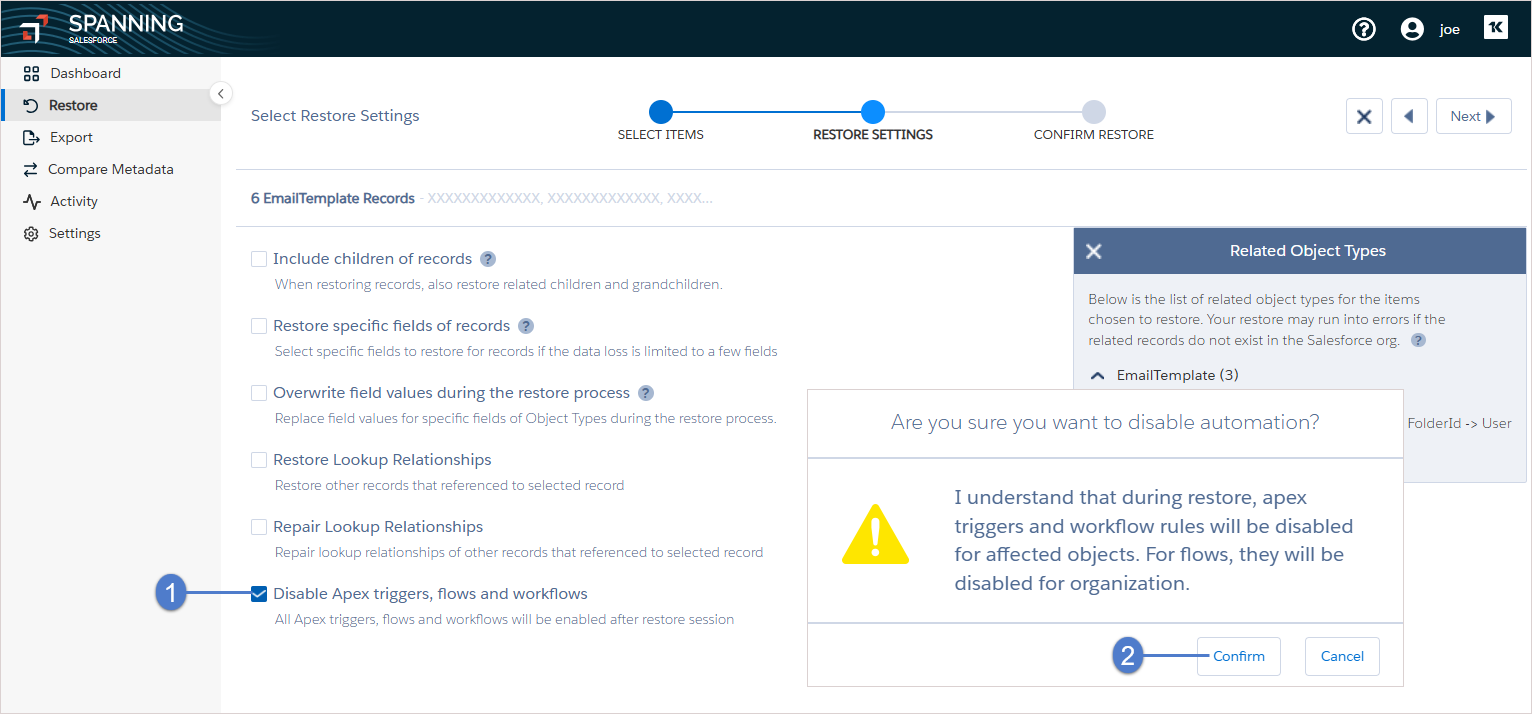
- Click Next.
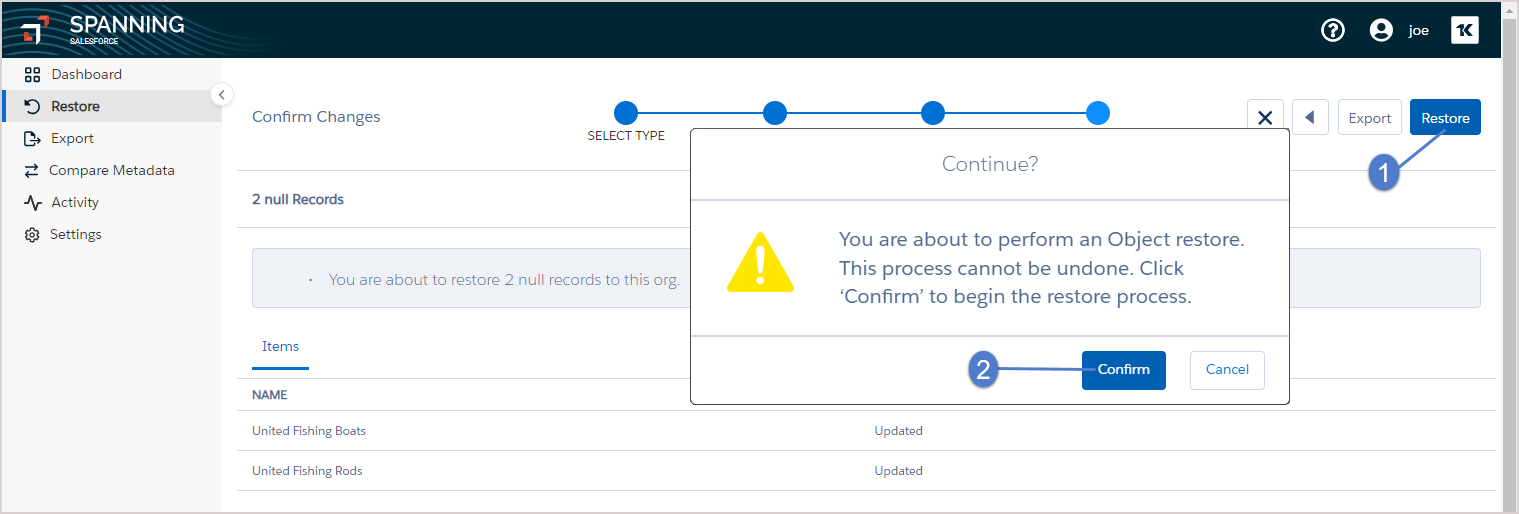
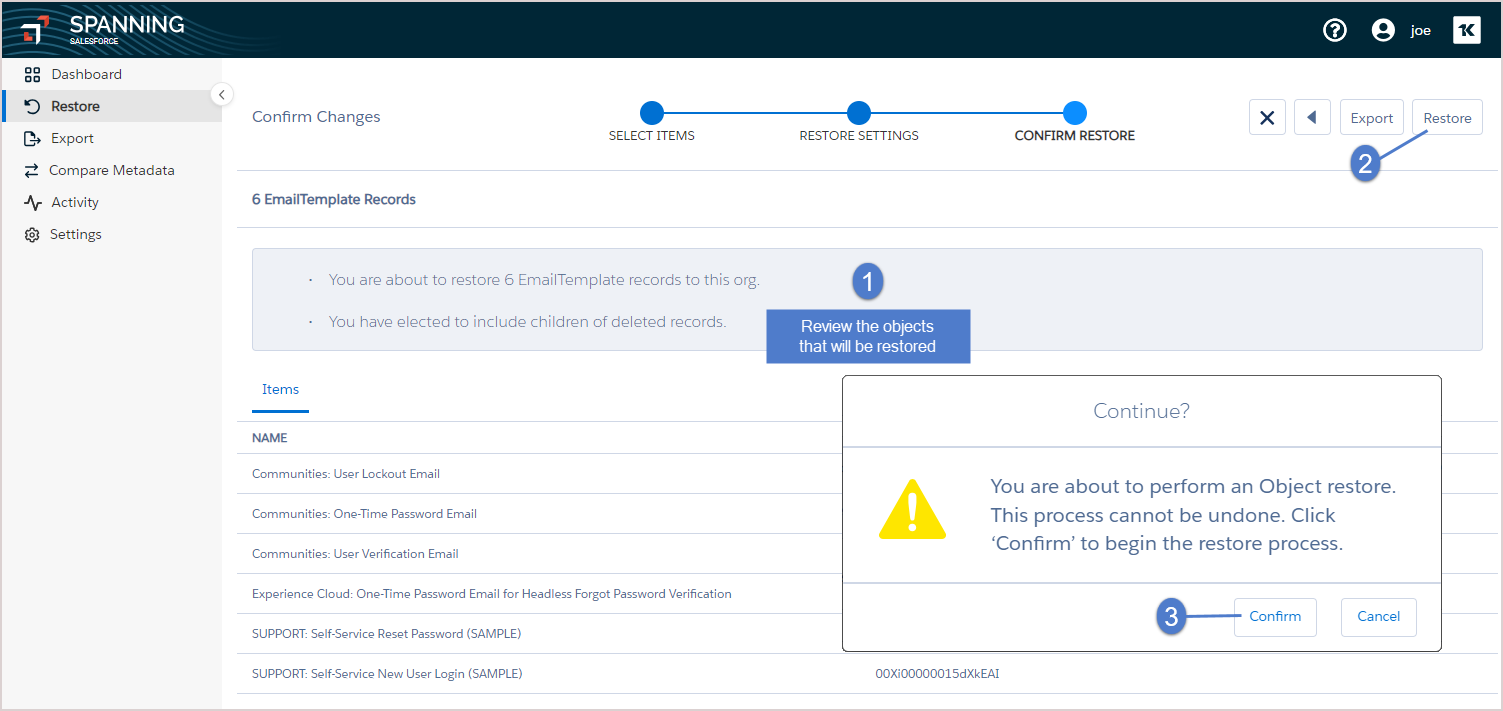
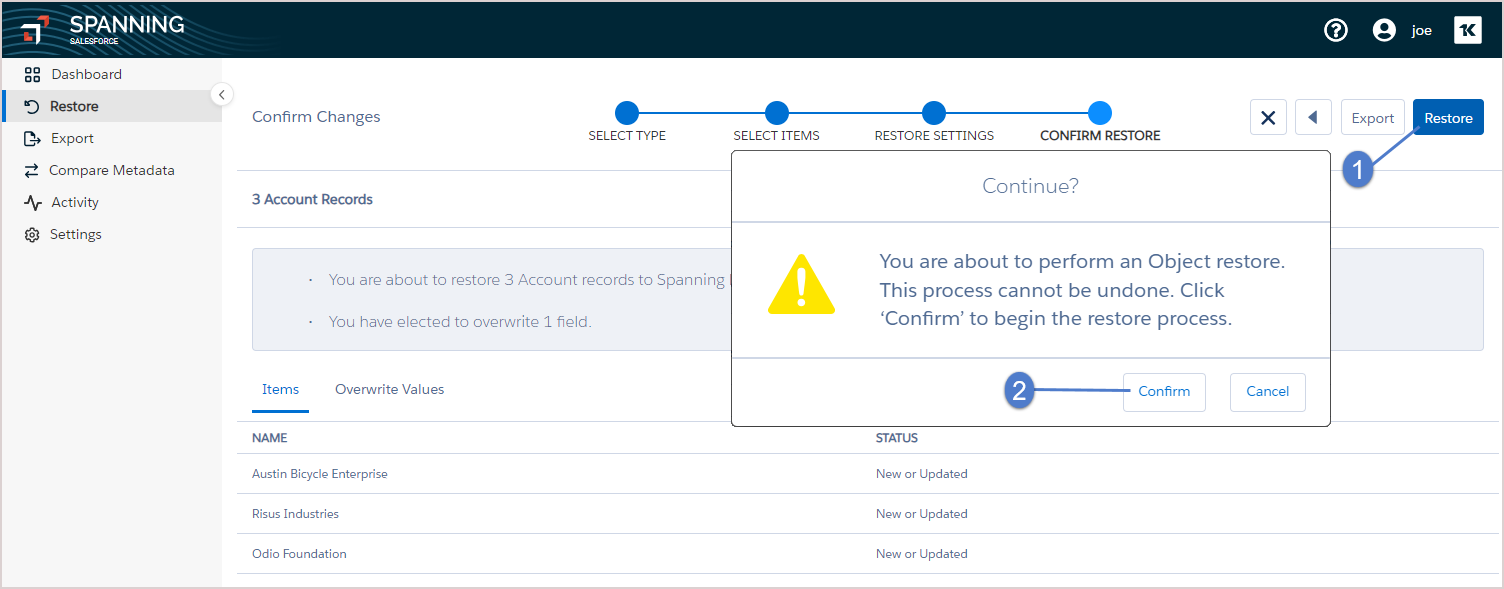
- In the Confirm Restore step, review the pending changes. Click Restore. Click Confirm. The selected data is restored to your Salesforce instance.
If you have run a process in your Salesforce environment that has updated the records for many fields in error, and you know exactly which records were affected and which records you need to restore, you can upload a CSV containing the IDs of the affected Salesforce records to perform a bulk restore. A single CSV file can have IDs of different object types, such as accounts, contacts, notes, and opportunities.
To restore to the same org by importing a CSV file:
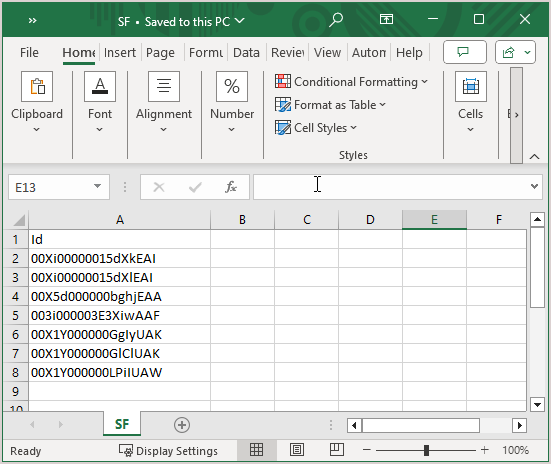
- Prepare your CSV file to match the format in the figure below.
- The CSV must contain a column with a header of Id (no quotes, not case-sensitive). The CSV can contain other columns if you'd like— Spanning Backup will only use the ID column and will ignore any other columns.
- In the Id column, list all of the Salesforce IDs that you want to restore. The IDs can be records of any object type. All Salesforce IDs to be loaded should be 18 characters long. The maximum file size allowed is 100 MB.
- Log in to Spanning Backup for Salesforce.
- Click Restore on the main Dashboard.
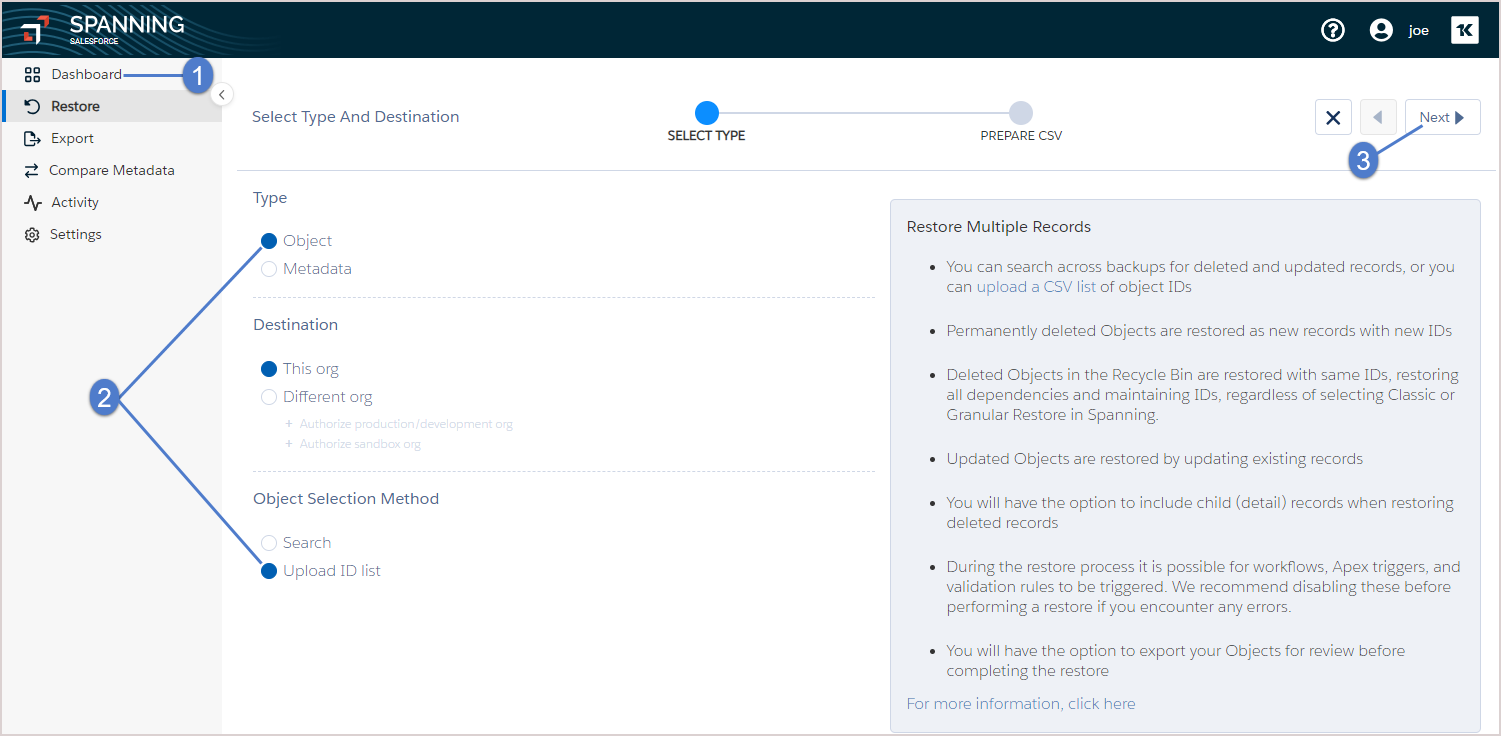
- In the Select Type step, make these selections:
- Select Object as the type of data you want to restore.
- Select This Org for the restore destination.
- Select Upload ID List for the object selection method.
- Click Next.
- In the Prepare CSV step, do the following:
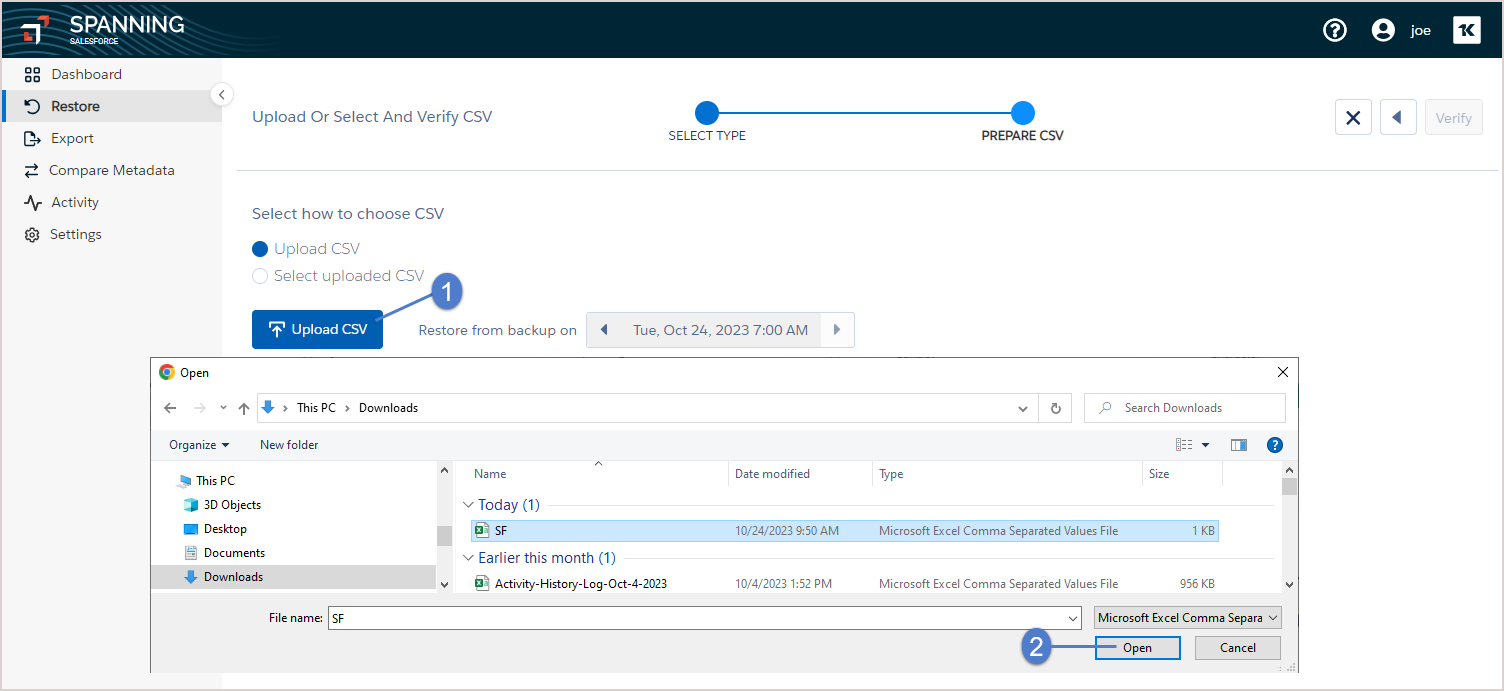
- Click Upload CSV. Browse to upload your CSV file.
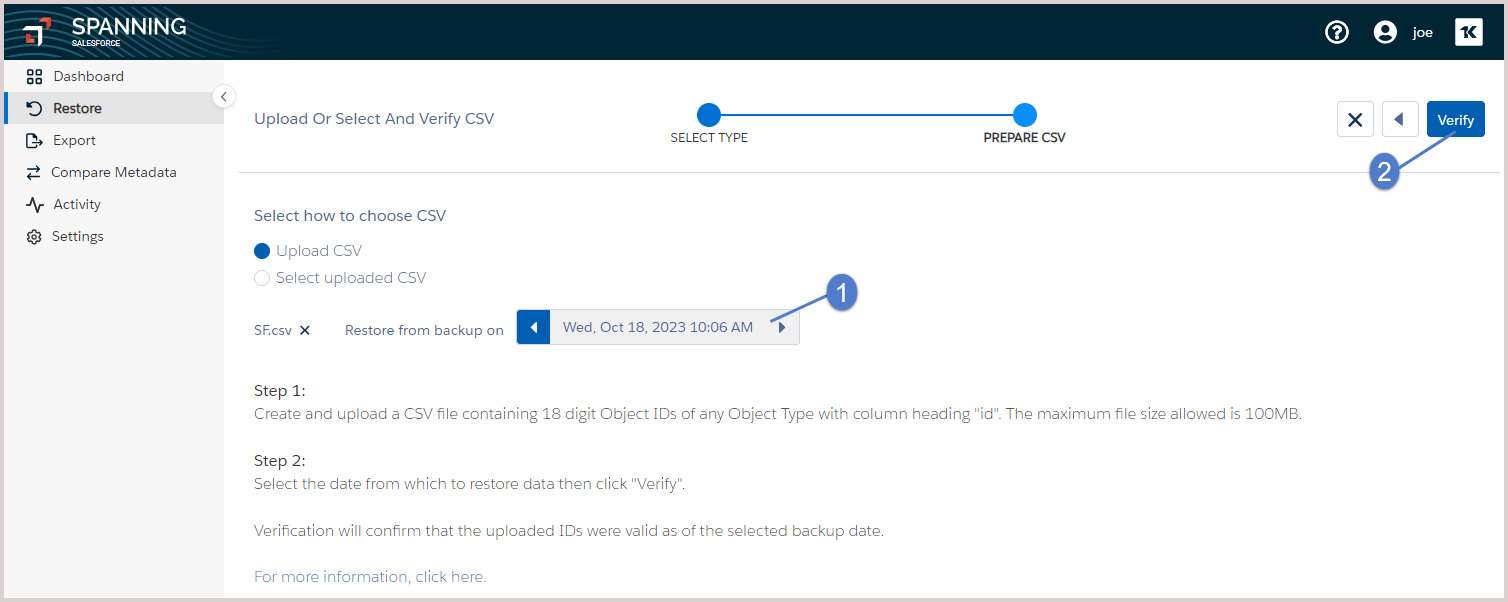
- Select the backup to restore from.
- Verify your CSV file. When verification is complete, you are notified via email and Chatter (if enabled).
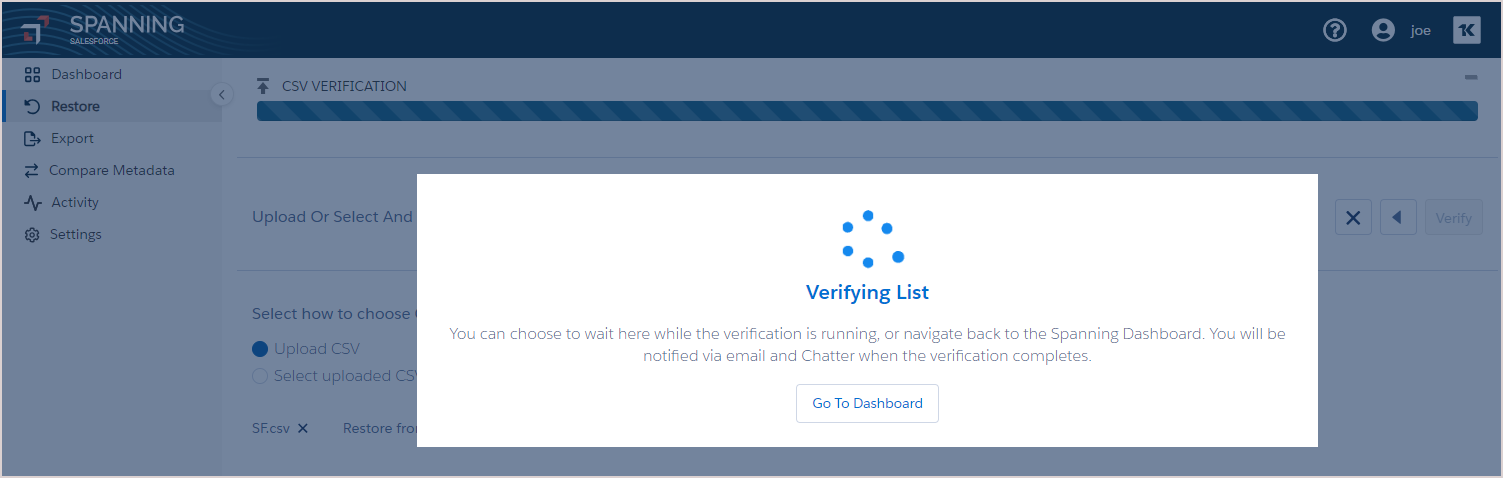
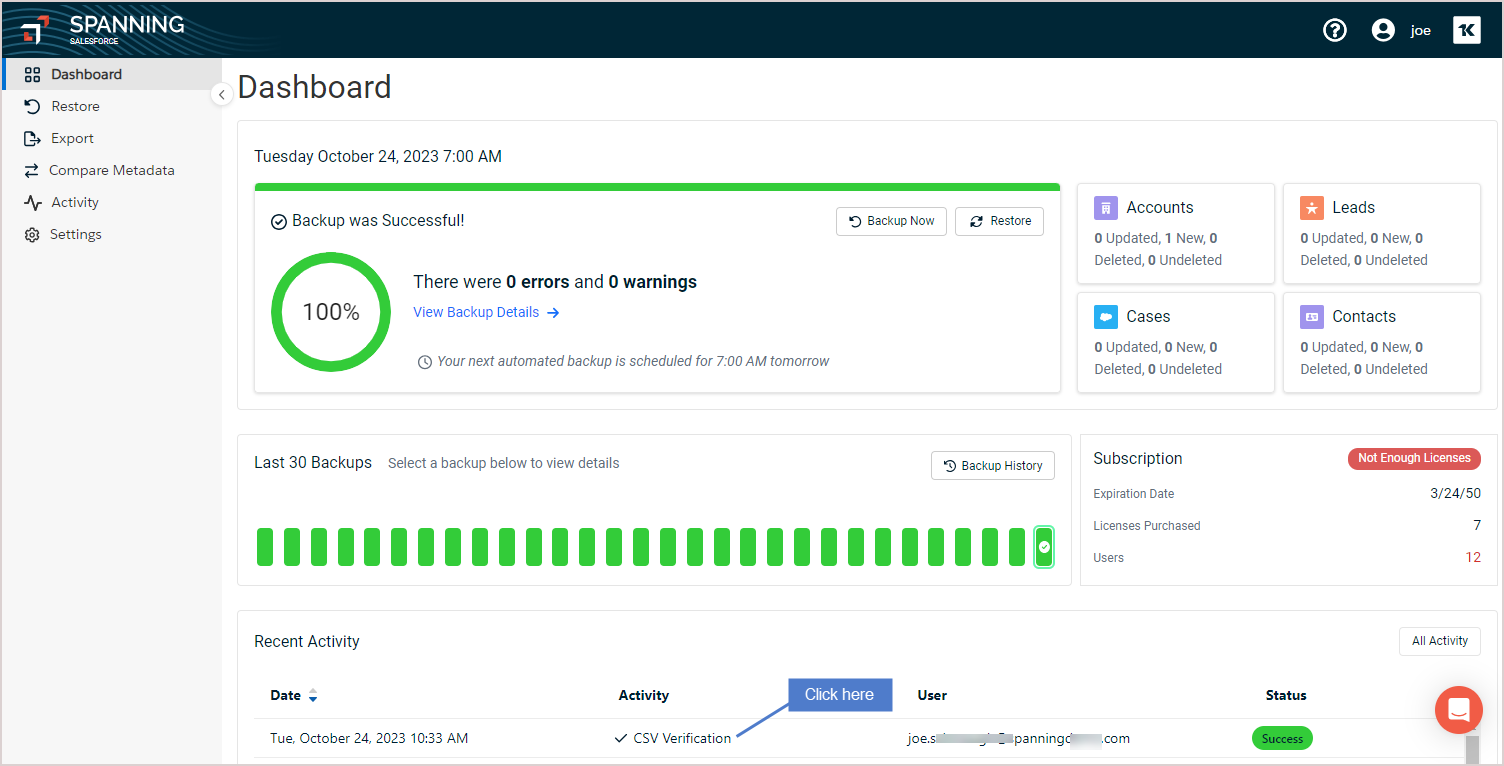
- You can wait on the CSV Verification page while the file is being verified or access the restore from the Dashboard or by clicking the link provided in the email or Chatter notification. To access the restore from the Dashboard, click the CSV Verification row in the Recent Activity:
- In the Select Items step, confirm that all of the correct records have been selected.
- If an object ID could not be found in the backup, it is not included in the restore. You can opt to download a CSV list of any missing records by clicking Download List.
- You can preview any item by clicking the Preview button before you restore the data. (To display the Preview button, hover over a row. The button displays on the right.)
- Click Next.

- In the Restore Settings step, select optional restore settings by checking the applicable boxes.
Settings are described in the following table.
Restore setting Description Include children of records Check this box to restore related child and grandchild records. Restore specific fields of records Check this box to restore specific fields if the data loss is limited to a few fields. (This applies only if a record contains updatable fields.) Check the box, then select the object type and fields that you want to restore.
Overwrite field values during the restore process Check this box to overwrite field values during the restore. Check the box, select the fields that you want to overwrite, and then input the values you want inserted. Alternatively, you can choose Saved Preset if you would like to reuse saved overwrite values or Save Preset to save the new values you enter.
Restore Lookup Relationships Check this box to restore lookup relationships. When records are restored, they generate a new Salesforce ID. This option attempts to update any lookup relationships that were referencing the record prior to restore.
Repair Lookup Relationships Check this box to repair lookup relationships. When records are restored, they generate a new Salesforce ID. This option attempts to repair any lookup relationships that were referencing the record prior to restore.
Disable Apex triggers, flows and workflows Check this box and click Confirm to disable triggers, flows, and workflows during the restore session. (Triggers, flows, and workflows are automatically re-enabled after the restore session.)
- Click Next.
- In the Confirm Restore step, click Restore, then click Confirm. Data is restored to your Salesforce instance.
Spanning Backup bulk restore to a different org enables admins to restore object data to a different production, development, or sandbox org in bulk— quickly, easily, and automatically from a specified point in time.
Start by reviewing the Prerequisites for restoring to a different organization. Then restore data using one of these methods:
- UI Search – Use to restore all updated, unchanged, or deleted records in an object type at once. For details, see To restore recently updated, deleted, or unchanged records to a different org.
- Upload CSV file – If you know exactly which records you need to restore, you can opt to upload a CSV file containing the Salesforce IDs of these records and restore them to another production, development, or sandbox Salesforce instance. For details, see To restore to a different org by uploading a CSV file.
Before restoring, ensure that these requirements have been met:
- Ensure that the destination org is setup with the same customizations and metadata as the source org.
- Disable workflows, Apex triggers, and validation rules for the destination org. (During the restore procedure, you can opt to disable Apex triggers, flows, and workflows during the restore session— right from the Spanning UI.)
- Ensure that the destination org has enough storage space to accommodate the data you select from the source org.
- Confirm that you are authenticated and have Modify All Data permission for the destination org.
Use this procedure to restore object data to a different organization by using the UI Search method.
- Log in to Spanning Backup for Salesforce.
- Click Restore on the main Dashboard.
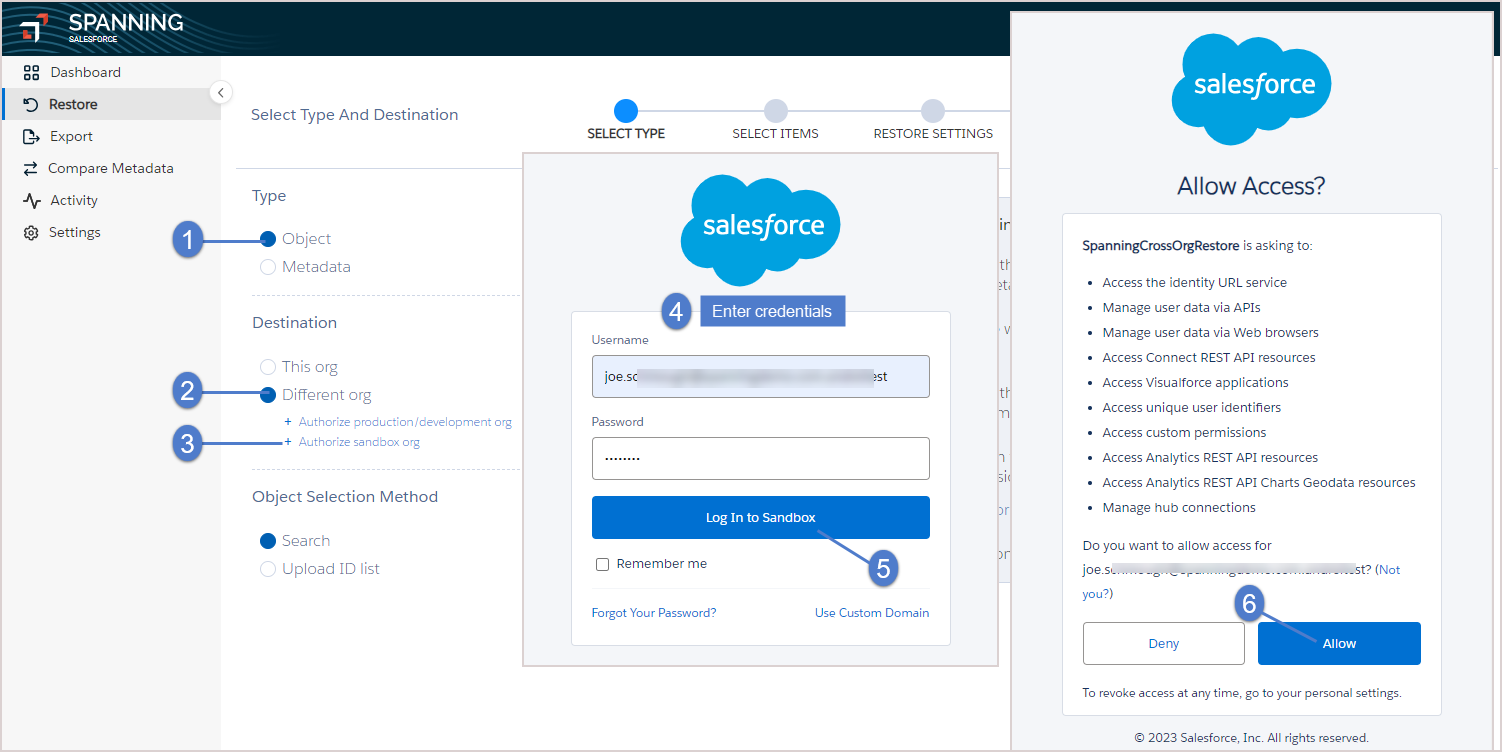
- In the Select Type step, select the following:
Select Object as the type of data you want to restore.
Select Different Org for the restore destination, then click the applicable Authorize Org link below to select the destination org.
When prompted, enter the login credentials for your destination org. Click Log In.
Click Allow to grant access.
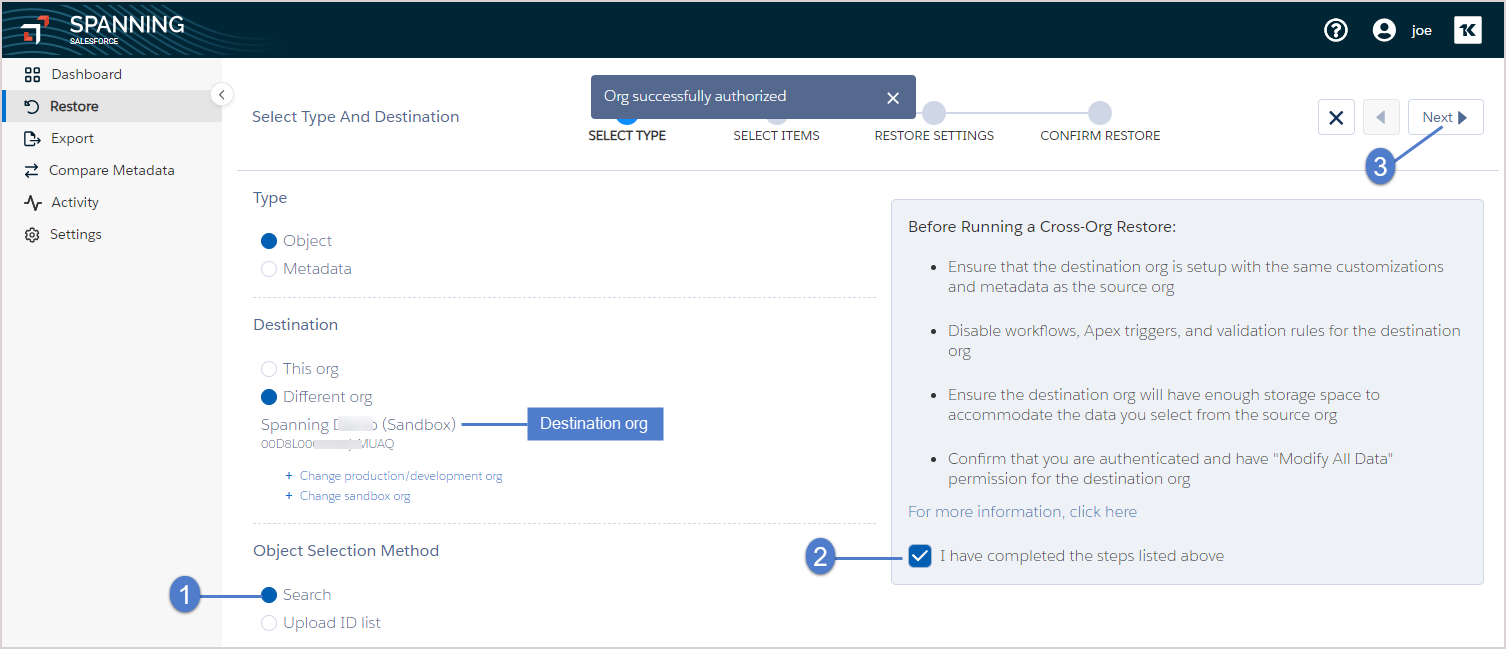
Ensure that Search is selected for the Object Selection Method.
Confirm that prerequisites in the Before Running a Cross-Org Restore list have been met by checking the I have completed the steps listed above box. (You will have the option to disable triggers, flows, and workflows later in this procedure— right from the Spanning UI.)
- Click Next.
- In the Select Items step, make the selections described below.
Select a date range and whether you want to display items that were Updated, Deleted, New or Updated, or Unchanged since the first backup selected.
Select the object types that you want to restore:
- To restore an entire object, select its checkbox.
- To restore selected items, click the object type but do not select its checkbox.
- In our example, we are recovering new or updated items from the Account object type.
(If applicable) Select the items that you would like to restore. You can select as many items as you like. Additionally, you can preview any item by clicking the Preview button before you restore the data. (To display the Preview button, hover over a row. The button displays on the right.)
- Click Next.

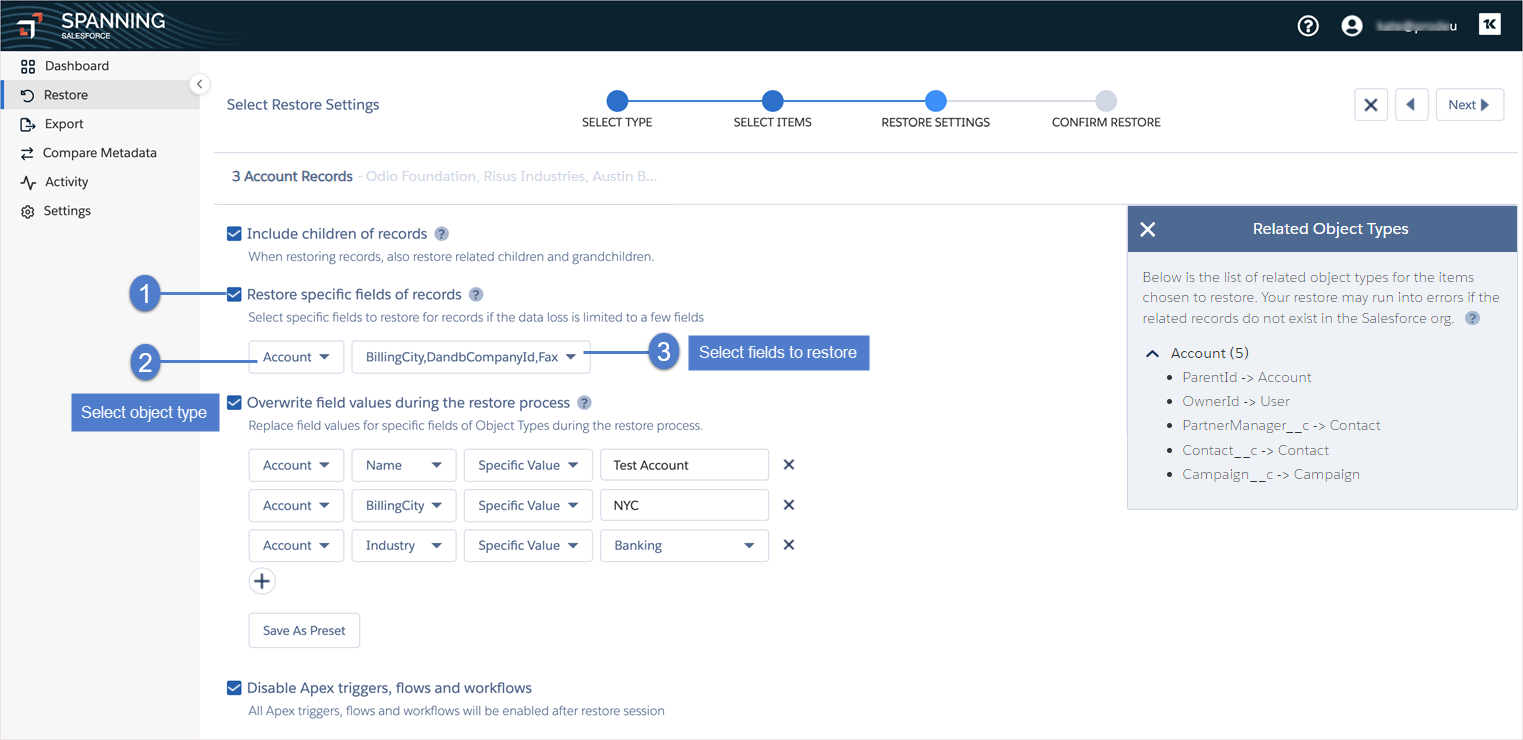
- In the Restore Settings step, select optional restore settings by checking the applicable boxes.
Settings are described in the following table.
Restore setting Description Include children of records Check this box to restore related child and grandchild records. Restore specific fields of records Check this box to restore specific fields if the data loss is limited to a few fields. (This applies only if a record contains updatable fields.) Check the box, then select the object type and fields that you want to restore.
Overwrite field values during the restore process Check this box to overwrite field values during the restore. Check the box, select the fields that you want to overwrite, and then input the values you want inserted. Alternatively, you can choose Saved Preset if you would like to reuse saved overwrite values or Save Preset to save the new values you enter.
Disable Apex triggers, flows and workflows Check this box and click Confirm to disable triggers, flows, and workflows during the restore session. (Triggers, flows, and workflows are automatically re-enabled after the restore session.)

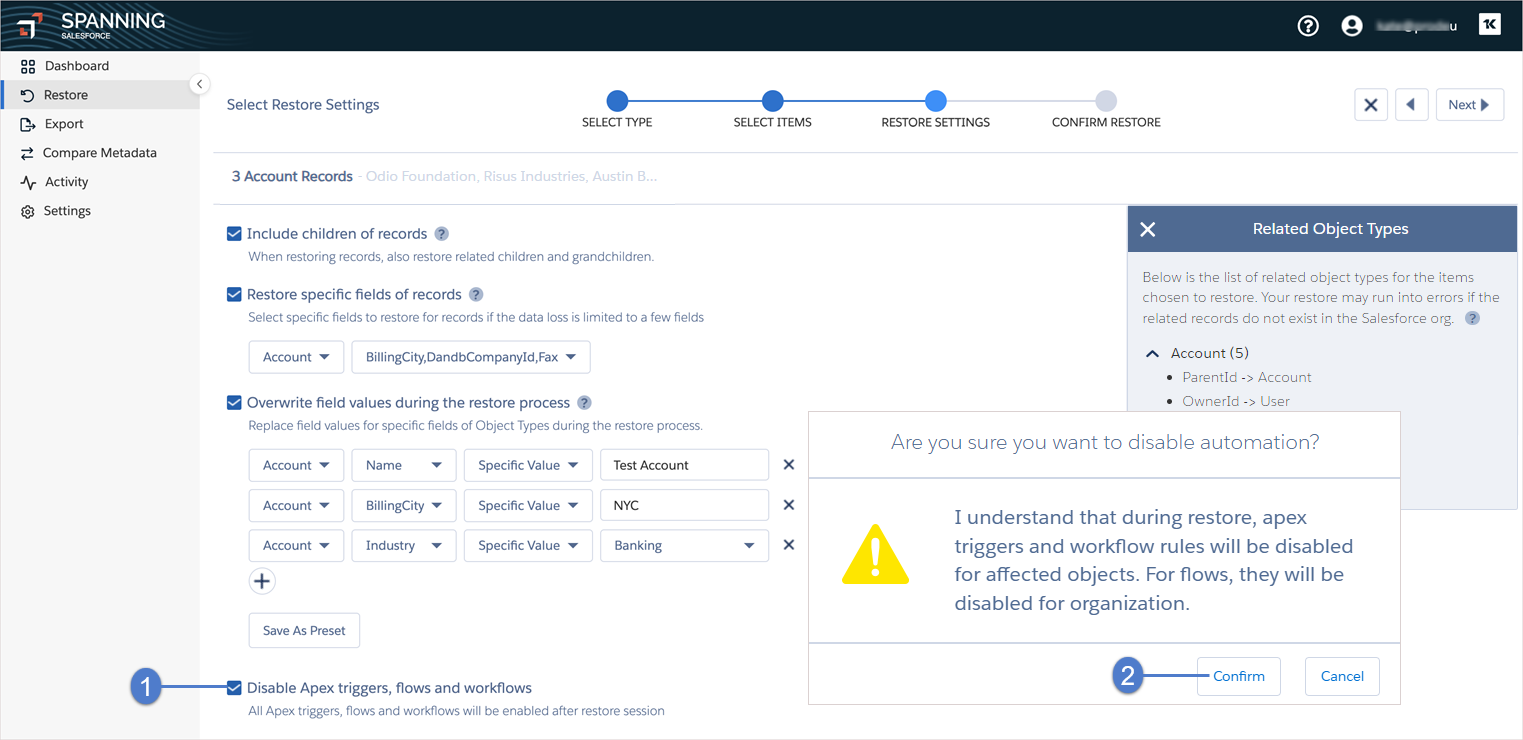
- Click Next.
- In the Confirm Restore step, review the pending changes. Click Restore. Click Confirm. The selected data is restored to the destination org.
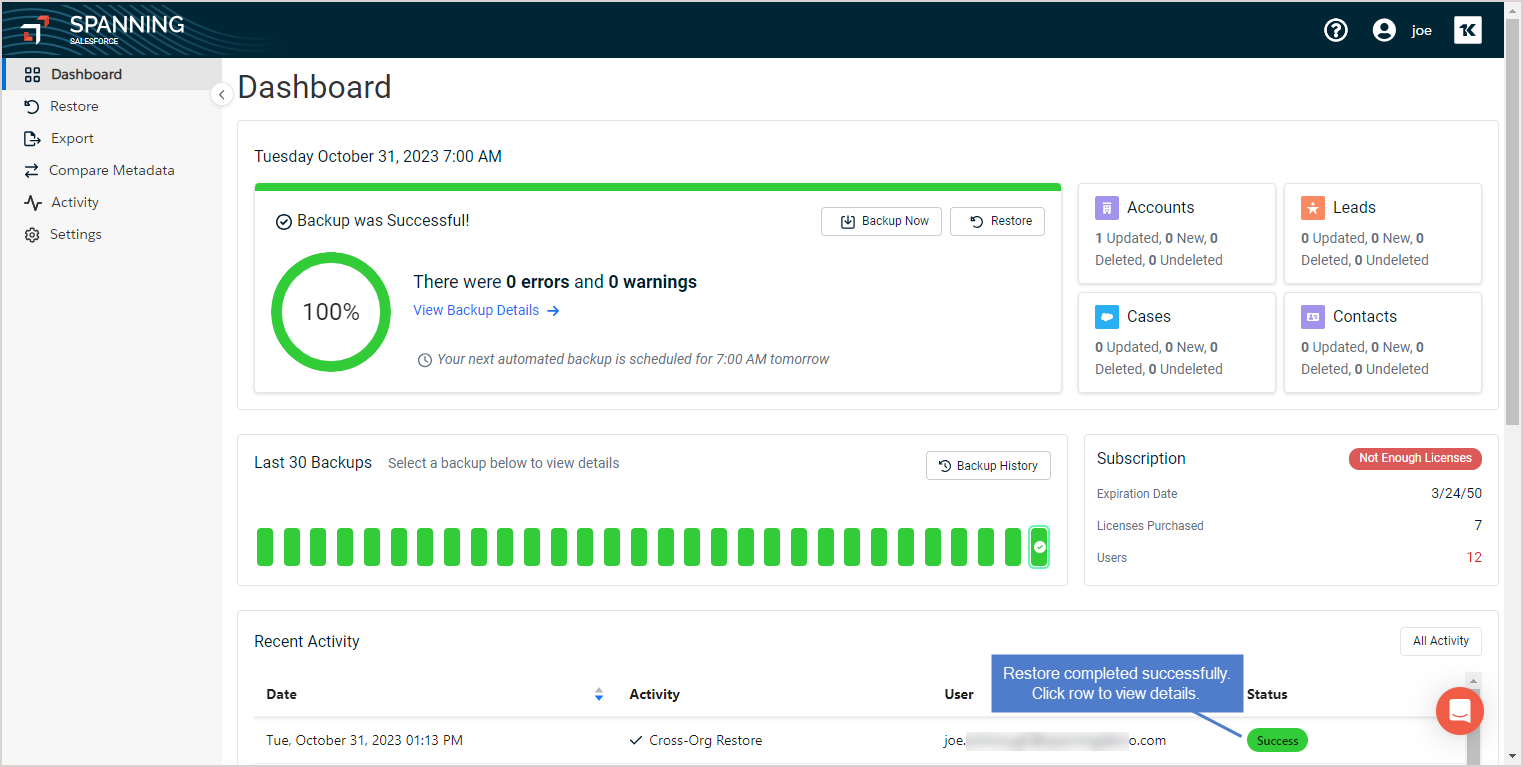
- When the restore is complete, you are notified via email and Chatter (if enabled). View the restore results on the Dashboard by clicking the Cross-Org Restore row in the Recent Activity.
If you have run a process in your Salesforce environment that has updated the records for many fields in error, and you know exactly which records were affected and which records you need to restore, you can upload a CSV containing the IDs of the affected Salesforce records to perform a bulk restore. A single CSV file can have IDs of different object types, such as accounts, contacts, notes, and opportunities.
To restore to a different org by importing a CSV file:
- Prepare your CSV file to match the format in the figure below.
- The CSV must contain a column with a header of Id (no quotes, not case-sensitive). The CSV can contain other columns if you’d like— Spanning Backup will only use the ID column and will ignore any other columns.
- In the Id column, list all of the Salesforce IDs that you want to restore. The IDs can be records of any object type. All Salesforce IDs to be loaded should be 18 characters long. The maximum file size allowed is 100 MB.
- Log in to Spanning Backup for Salesforce.
- Click Restore on the main Dashboard.
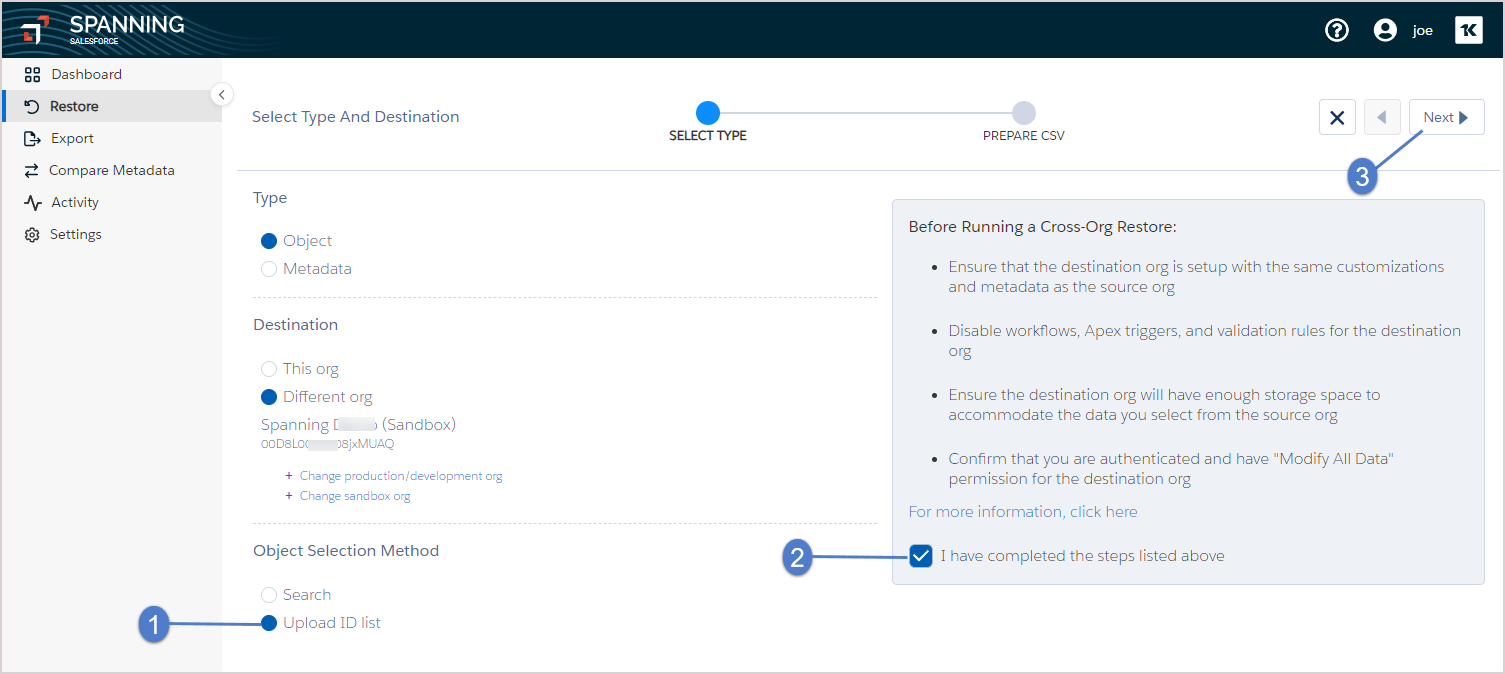
- In the Select Type step, make the selections described below.
Select Object as the type of data you want to restore.
Select Different Org for the restore destination, then click the applicable Authorize Org link below to select the destination org.
When prompted, enter the login credentials for your destination org. Click Log In.
Click Allow to grant access.
Select Upload ID list for the Object Selection Method.
Confirm that prerequisites in the Before Running a Cross-Org Restore list have been met by checking the I have completed the steps listed above box. (You will have the option to disable triggers, flows, and workflows later in this procedure— right from the Spanning UI.)
- Click Next.
- In the Prepare CSV step, do the following:
Click Upload CSV. Browse to upload your CSV file.
Select the backup to restore from.
Verify your CSV file. When the verification is complete, you are notified via email and Chatter (if enabled).
You can wait on the CSV Verification page while the file is being verified or access the verify operation later from the Dashboard or by clicking the link provided in the email or Chatter notification. To view verification details from the Dashboard, click the CSV Verification row in the Recent Activity:
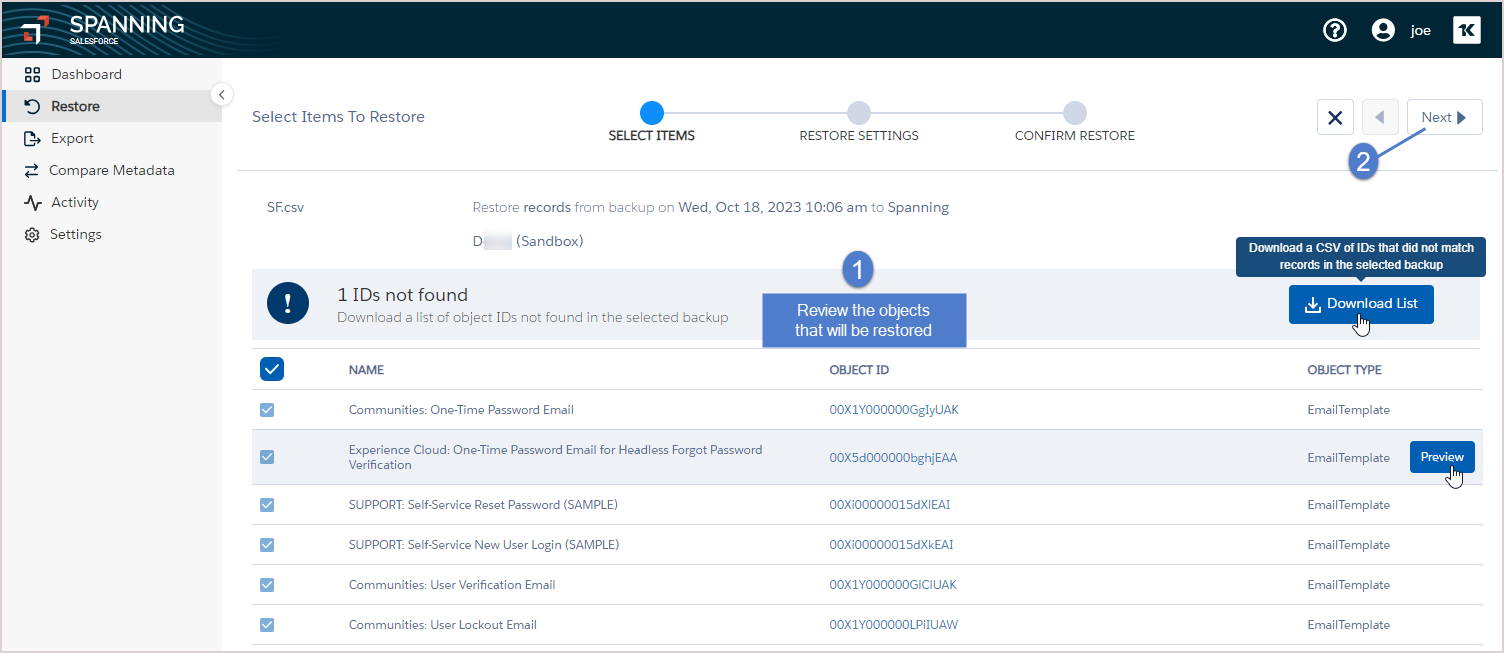
- In the Select Items step, confirm that all of the correct records have been selected.
If an object ID could not be found in the backup, it is not included in the restore. You can opt to download a CSV list of any missing records by clicking Download List.
You can preview any item by clicking the Preview button before you restore the data. (To display the Preview button, hover over a row. The button displays on the right.)
- Click Next.
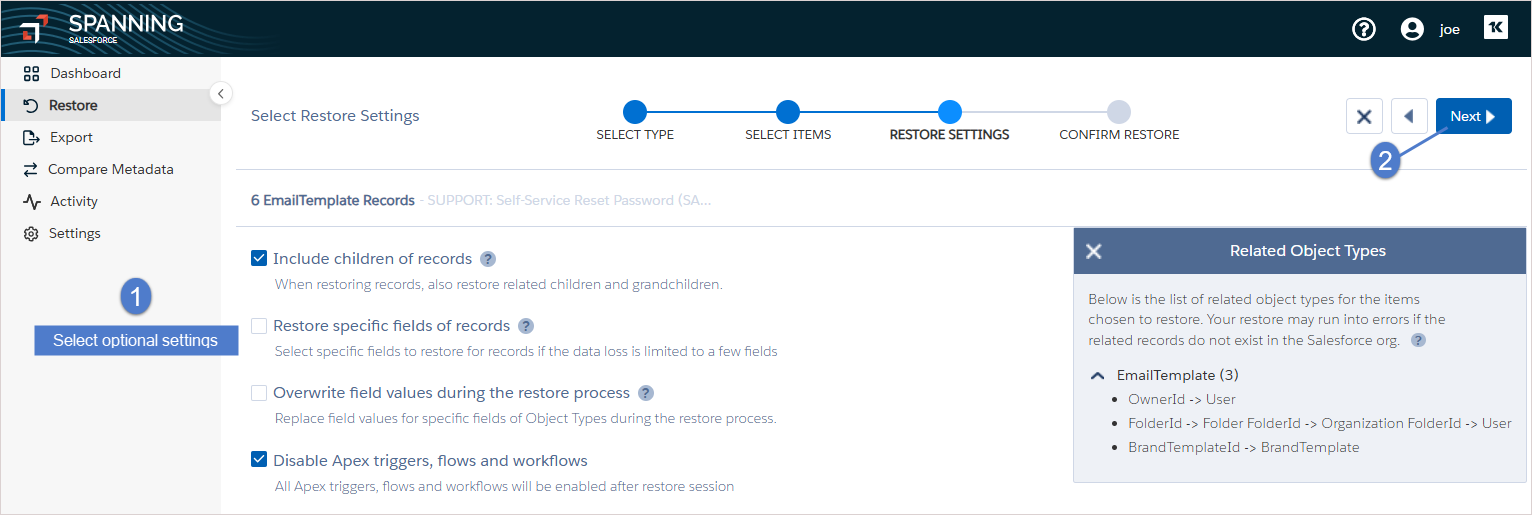
- In the Restore Settings step, select optional restore settings by checking the applicable boxes.
Settings are described in the following table
Restore setting Description Include children of records Check this box to restore related child and grandchild records. Restore specific fields of records Check this box to restore specific fields if the data loss is limited to a few fields. (This applies only if a record contains updatable fields.) Check the box, then select the object type and fields that you want to restore.
Overwrite field values during the restore process Check this box to overwrite field values during the restore. Check the box, select the fields that you want to overwrite, and then input the values you want inserted. Alternatively, you can choose Saved Preset if you would like to reuse saved overwrite values or Save Preset to save the new values you enter.
Disable Apex triggers, flows and workflows Check this box and click Confirm to disable triggers, flows, and workflows during the restore session. (Triggers, flows, and workflows are automatically re-enabled after the restore session.)
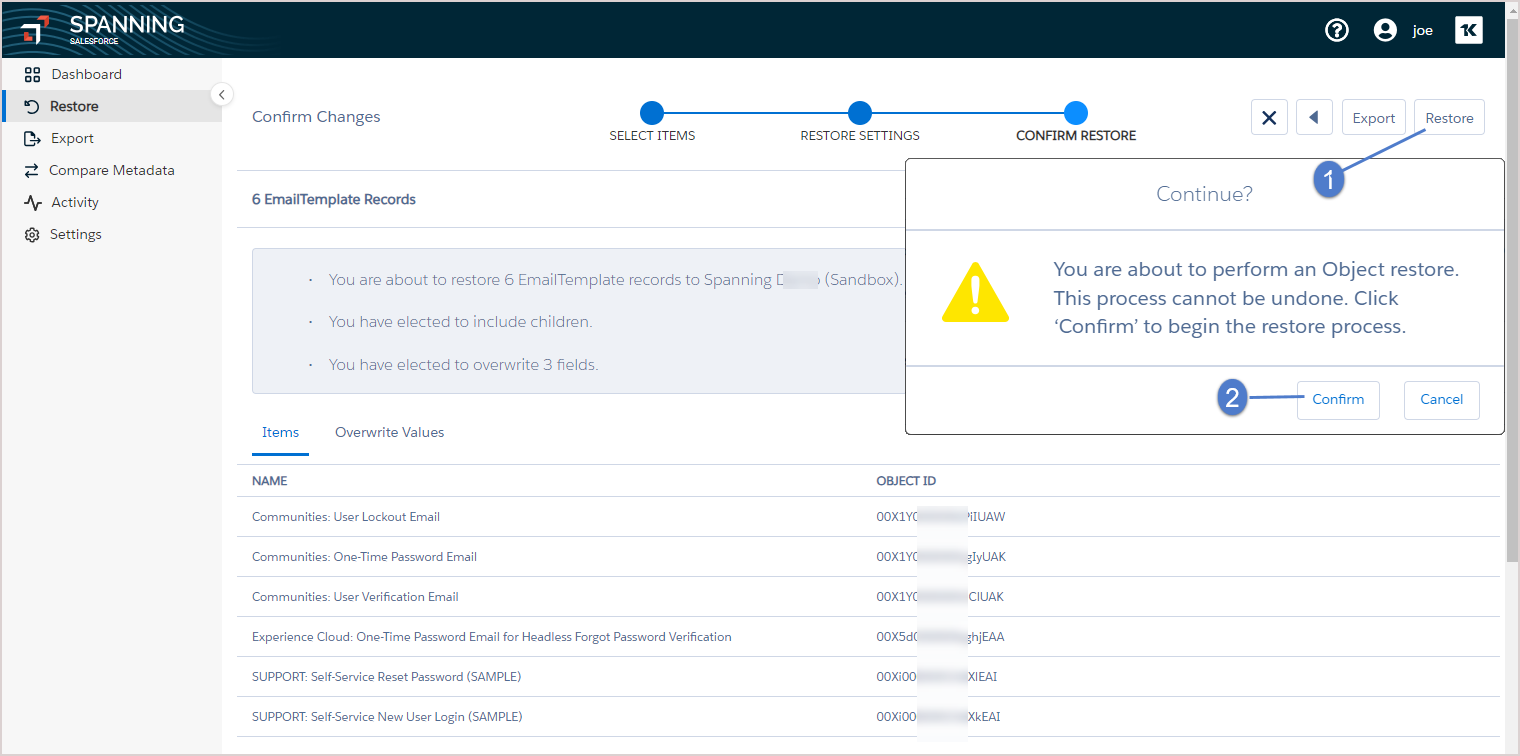
- Click Next.
- Click Restore. Click Confirm. Data is restored to the selected organization.
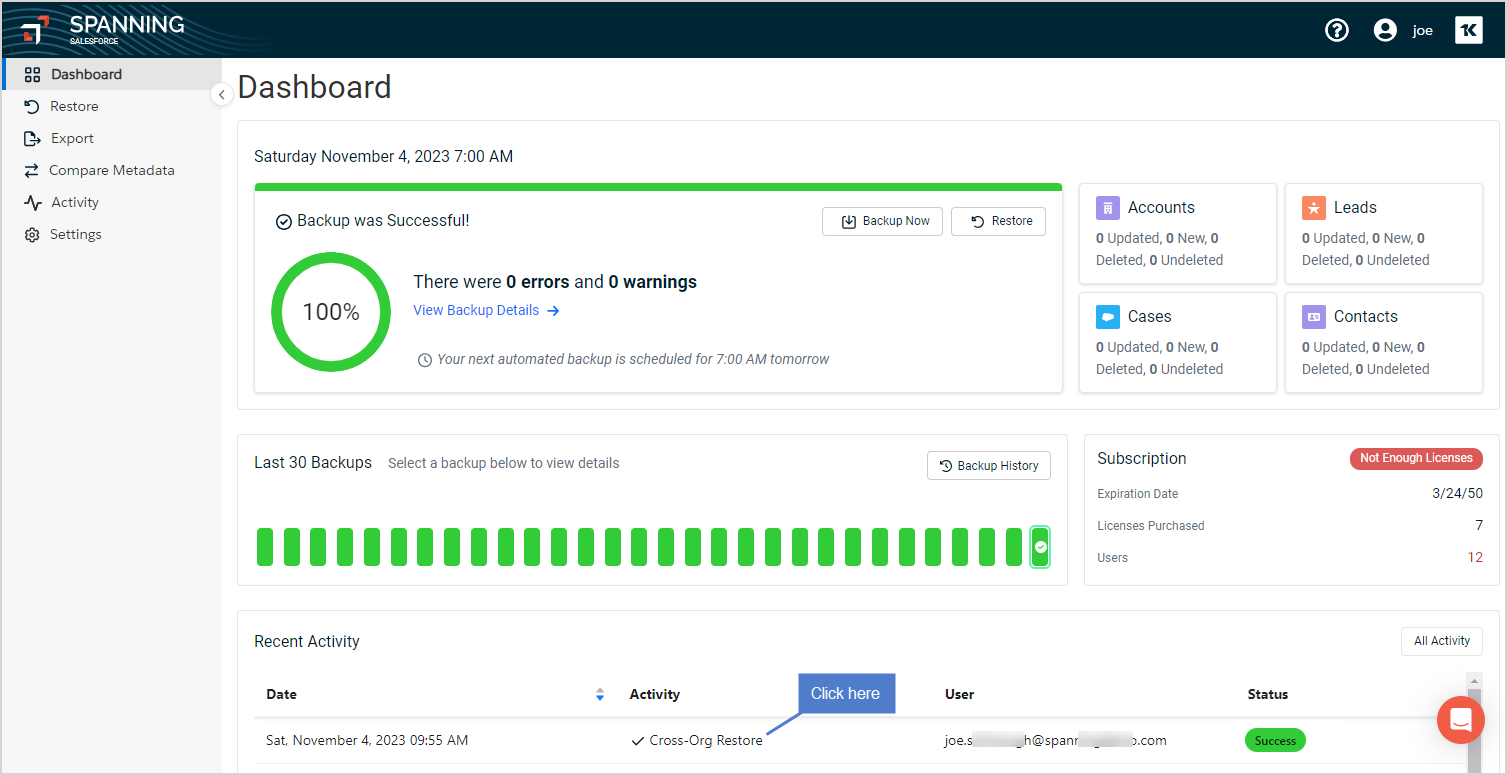
- When the restore is complete, you are notified via email and Chatter (if enabled). View the restore results on the Dashboard by clicking the Cross-Org Restore row in the Recent Activity.
If you encounter errors during a bulk restore, see How to reduce bulk restore errors using Related Object Types.


