This guide targets Spanning Backup for Salesforce administrators. It contains the information you need to setup and configure Spanning Backup for Salesforce. Also, this guide includes instructions on how to use Spanning to restore data, export data, and manage Spanning Backup.
IMPORTANT Salesforce is rolling out mandatory security changes that affect how connected apps handle OAuth authentication.
Action is required by June 10, 2026.
Start by installing and configuring Spanning Backup.
The steps provided below guide you through the installation process and application configuration. Step 1 through Step 3 are required to ensure all of your data is properly backed up and available for export and restore by administrators. The optional steps that follow can be performed to manually run your first backup, enable on-page, field-level restores of record data, and to give your administrators additional visibility into backup and restore activity.
The following are required to protect your Salesforce environment with Spanning Backup:
- Your Salesforce instance must be running one of these supported versions: Unlimited, Performance, Enterprise, or Developer.
NOTE Salesforce Professional is not supported as this version does not allow user profiles to be modified, which is a necessary step in configuring Spanning Backup for Salesforce.
- To perform the installation procedures, you must use a Salesforce System Admin account with full administrative rights to the Salesforce environment where you will install Spanning Backup.
- Your Salesforce environment must be configured to allow network traffic as described in Will IP restrictions in Salesforce cause issues with Spanning Backup?
Use this procedure to install the Spanning Backup package in your production and sandbox Salesforce environments.
- Click the applicable URL below to install the package in your production or sandbox environment:
Install in your production environment:
https://login.salesforce.com/packaging/installPackage.apexp?p0=04tfj000000LJZFInstall in your sandbox environment:
https://test.salesforce.com/packaging/installPackage.apexp?p0=04tfj000000LJZF
-
Select Install for Admins Only, then click Install:

-
Confirm installation of the package.
The system begins the installation. -
After you install the package, you see this message: Installation Complete!. Click Done.
-
At this point the Spanning Backup for Salesforce package is installed in your organization, but still needs to be configured. Proceed to Step 2: Configure Spanning Backup for administrators.
Use this procedure to enable the administrators in your organization to manage backups, restore data, and export data.
-
Log in to your Salesforce instance as an Administrator.
-
In the left navigation menu, go to Administration Setup > Manage Apps > Connected Apps:

-
Select SpanningBackup from the list and then click Edit at the top of the page.
-
Under OAuth Policies, make sure Permitted Users is set to Admin Approved users are preauthorized. Click Save.

NOTE If you see a confirmation box with the message Enabling this option will result in all users currently using this app being denied access. Please reference the Connected Apps OAuth Usage Report if you are unsure who is using the app, select OK to dismiss the message. Then click Save.
-
On the Connected Apps page, select SpanningOauth from the list and then click Edit at the top of the page.
-
Under OAuth Policies, make sure Permitted Users is set to Admin Approved users are preauthorized. Click Save.
-
On the Connected Apps page, both SpanningBackup and OAuth Policies should now have Permitted Users set to Admin Approved users are preauthorized as shown here:

-
In the left navigation menu, go to Administration Setup > Manage Users > Profiles:
-
Click System Administrator and then click Assigned Connected Apps:

If Assigned Connected Apps is missing from your Setup for System Administrator, use these steps for each administrator profile that needs access to Spanning Backup:
Navigate to the Connected App Access section:
Click Edit. Ensure that SpanningBackup and SpanningOauth are both in Enabled Connected Apps or Connected App Access. Click Save.
Navigate back to the System Administrator profile and click VisualForce Page Access.
Confirm that SpanningBackup and SpanningRestore are in the Enabled VisualForce Pages. If not, click Edit and add them to enable Spanning backup and restore for the administrator. Click Save.


-
Navigate to the SpanningBackup tab.
NOTE If you are unable to access Spanning when navigating to it in your Salesforce environment, it is possible that there is a security setting either in your network's firewall or Salesforce configuration that is preventing access to Spanning.
-
Select a deployment region. Spanning Backup for Salesforce is available from multiple regions (US, EU, Canada, UK, and Australia) and allows you to select where your data is processed and stored. Once this selection is made, it cannot be changed.
-
Select an Encryption Key Management option. Spanning Backup for Salesforce offers customer managed encryption keys using Amazon Web Services Key Management Service (AWS KMS). Once this selection is made, it cannot be changed.
-
Proceed to Step 3: Configure API usage.
Spanning Backup allows you to configure the maximum number of API calls per day that Spanning can make against your Salesforce organization. Spanning Backup sets its Application Programming Interface (API) limit to 15% of the total daily allocation of API calls for the organization by default. For medium to large organizations, this could be fewer than is needed to complete an initial backup.
To determine the right number of API calls for your organization, you can first check the number available in your Salesforce.com organization:
-
In Salesforce.com , navigate to Setup > Monitor > System Overview.
OR
-
If you are using the Salesforce Lightning Experience, navigate to Setup > Platform Tools > Environments > System Overview.
The API usage displays in the top right and shows the percentage used and the maximum:
Next, you can estimate the number of API calls Spanning Backup will need for the initial backup.
Spanning will use approximately one API call for every 2000 objects and one for each attachment. Often, customers will have hundreds of thousands or millions of API calls available and allow Spanning to use 10-20%.
To change Spanning Backup’s API limit:
-
In Salesforce.com, navigate to the SpanningBackup dashboard. Then click CHANGE API LIMIT located in the lower left of the main dashboard page.

-
Specify the API limit and click OK.

-
Proceed to (Optional) Step 4: Run Spanning's initial backup.
Spanning will begin running daily backups automatically, but you can opt to use this procedure to run your first backup right away. The first backup of your Salesforce data takes the longest to complete since it includes all of the data in your account. After Spanning completes the first backup, subsequent daily backups are much faster since they include only new and changed data.
To start your initial, on-demand backup:
- Log in to Spanning Backup for Salesforce.
- Click Back Up Now on the main Dashboard.
- The backup starts and a progress bar displays. Depending on the size of your organization, the backup could take minutes, hours, or possibly days if your organization has a lot of data.


When the backup is complete, the Dashboard displays the status of the backup. You can click Backup Details to see information about your backup, including all the object types protected and their counts.

This optional step enables all Salesforce end users to restore any records that they have permissions/rights to edit.
NOTE This functionality is not available for the Salesforce Lightning Experience.
Use this procedure to enable end user restore:
-
In Salesforce, navigate to Standard User > Manage Users > Profiles.
-
Under Assigned Connected App Access, click Edit.
-
Add SpanningRestore to VisualForce Page Access, then click Save.
This optional step enables authorized users to initiate field-level compare and restore of Salesforce records by clicking a persistent button in the left navigation bar.
- In addition to adding this universal restore button, you can add individual restore buttons to specific page layouts (see Step 7: (Optional) Add Spanning restore buttons to page layouts in Salesforce).
- This functionality is not available for the Salesforce Lightning Experience.
Use this procedure to enable field-level compare and restore for end uses:
-
In Salesforce, navigate to Customize > Home > Home Page Components. Click New, then Next.
-
Set the Name to Universal Restore and select Visualforce Area as the Type. Click Next.

-
Set the following parameters and then click Save:
Component Position: Narrow (Left) column
Visualforce Page: SpanningUniversalRestore
Height (in pixels): 32
Show scrollbars: false (no check)
Show label: false (no check)
-
Add the new component to Layout (so it shows up everywhere):
Navigate to Customize > Home > Home Page Layouts.
Click Edit on the layout you would like to add the button to. The default layout is Dashboard Home Page Default.
In the Select Narrow Components to Show section, check Universal Restore. Click Next.
Confirm that Universal Restore is listed in the Narrow (left) Column, then click Save.
Go to Customize > User Interface and click Show Custom Sidebar Components on All Pages. Click Save.

-
Return to Salesforce and select an object, such as an Account. You should see the SpanningRestore button in the left navigation.

NOTE When the user is on a specific record, the Spanning Restore button is dark blue and active. When the user is on a menu or other non-record page, the Spanning Restore button is gray and inactive.
You can click the SpanningRestore button to initiate a field-level restore of the current record:

This optional step enables authorized users to initiate field-level compare and restore of Salesforce record data directly from the individual record page. The following steps demonstrate the process for adding a restore button to the standard page layout for Accounts. This process can be repeated for Contacts, Opportunities, and Leads.
NOTE Other objects can also be configured to use the Spanning Restore functionality, but they require an object-specific button to be created for each type. See Create Spanning restore buttons for custom objects to add new buttons for additional object types. Then run the procedure below to add your newly created buttons to the applicable page layouts.
Use this procedure to add a Spanning restore button to the page layout :
-
In Salesforce, navigate to Customize >Accounts > Page Layouts.
-
Click Edit for the page layout that you will add the button to (Account Layout in our example).
-
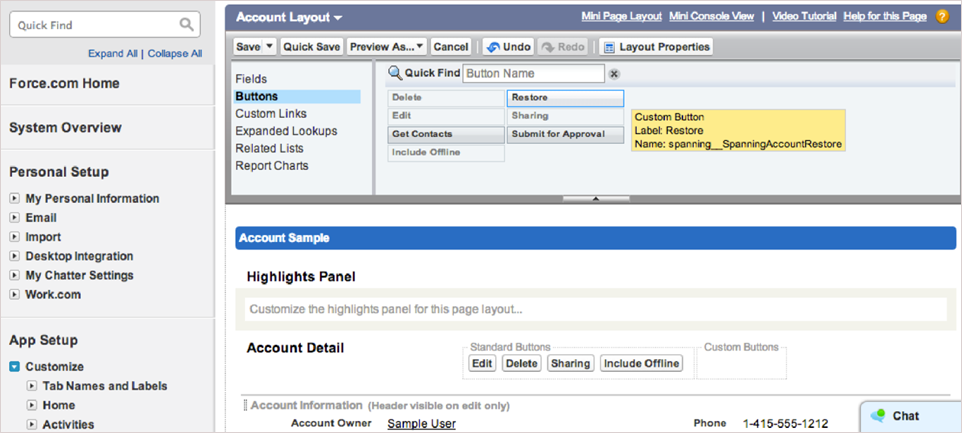
In the Layout section at the top of the page, click Buttons.
-
Drag-and-drop the Restore button into the custom buttons area:
-
Repeat the above steps for the other buttons provided in the Spanning Backup for Salesforce package: Contacts, Opportunities, and Leads.
To add a restore button to other objects, you will need to create a custom button as described in these steps:
-
In Salesforce, navigate to Customize > {ObjectType} > Buttons, Links and Actions.
-
Click New Button or Link and set the following fields:
- Label: Restore
- Name: Spanning{ObjectType}Restore, replacing {ObjectType} with a specific type, e.g., Case
- Display Type: Detail Page Button
- Behavior: Execute Javascript
- Content Source: OnClick Javascript
- Add the following to the Javascript text area below, replacing the Case objectType with your actual object type:
window.location='/apex/spanning__SpanningRestore? objectId={!Case.Id}&objectType=Case&page=restore& auth=user&retUrl=' + document.URL;

-
Click Save.
-
Add the new button to the object’s page layout as described in Step 7: (Optional) Add Spanning restore buttons to page layouts in Salesforce.
During installation, you configured your Spanning Backup for Salesforce environment and began running daily backups.
See these topics for details on monitoring and managing Spanning Backup:
- Working with backups to modify the daily automated backup schedule, run a backup on-demand, check the status of recent backups, and modify the API call limit used for backups.
- Customizing the Dashboard to modify the object types that display on the dashboard and are used for notifications.
- Configuring Spanning Backup settings to view or modify these settings: account information, notifications, user permissions, rule-based alerts, the external API key and secret, backup data deletion, and anonymization, and Kaseya IT Complete features.
- Restoring object data to restore objects to the same organization or to a different Salesforce organization.
- Restoring metadata to restore metadata components to the same organization or to a different Salesforce organization.
- Comparing metadata to compare metadata components in the selected backup to live Salesforce data or to data in a later backup, and optionally restore components from the comparison results.
- Exporting data to export backed up data to a CSV file and download it to your local machine.
- Viewing application activity to view a log of Spanning events (such as backups and restores) and drill down to run related operations.


